最近更新于 2024-05-10 10:04
前言
今天(2023.8.31)有个学长问我接不接一个单子,奈何没学过 Java,本来不打算接的。只是报酬感觉还不错,就接了。
要求的完成时间是在10月初,总共有一个月左右的时间,Java 用几天学完基础应该没啥问题,再尝试完成项目。有压力,学习的效率也比较高。
因为项目要求使用 Java 8,我就用的这个版本起始。
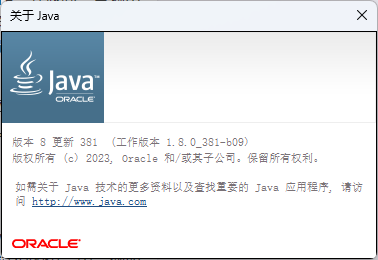
其中在入手的过程中有一些注意到的特点,这里作记录:
- 一个文件中的公开类必须和文件名一样,因此一个文件中只能有一个公开类;
- 入口函数(main)必须是 public 和 static 的,返回值类型必须是 void,参数是一个字符串数组;
- Java 程序要先使用 javac 后跟上文件名编译,然后会生成 class 扩展名的字节文件,然后使用 java 跟上类名就能运行(Java 11 开始可以直接使用 java 命令实现编译并运行)。其中印象比较深的是一个 Java 文件中可以有多个入口函数,入口函数必须放在类中,运行的时候指定哪个类名就可以运行哪个类中的入口函数(这一点和 C/C++ 大不同,以前没接触过这种写法,py 也只是没有入口函数的规定)。在开发测试过程中倒是不用手动去运行编译,我使用 VScode + 插件 + Java 的环境,一键运行调试更为方便。对于 Java 开发也有一些不错的 IDE,比如 IDEA、Eclipse 之类的,我是因为平时涉及 C/C++/Py 开发,用 VScode 可以通过扩展兼容,同时做开发都行,不用分别去安装软件,也比较轻量。代码编写只需要一个顺手的编辑器,然后通过插件协调调用编译器或解释器调试就行。

- 如果出现“编码GBK的不可映射字符”,就是编码问题。碰到一次用终端编译 UTF-8 编码的含中文的文件的时候出现报错,然后是熟悉的乱码,这个在编译的时候加上参数
-encoding UTF-8就和文件编码匹配了。用 VScode 的时候应该是根据文件编码自动匹配了参数的。或者是正常编译了含有中文的文件,但是运行输出乱码,也可以这样处理。

简单 CS 通信
2023.9.1
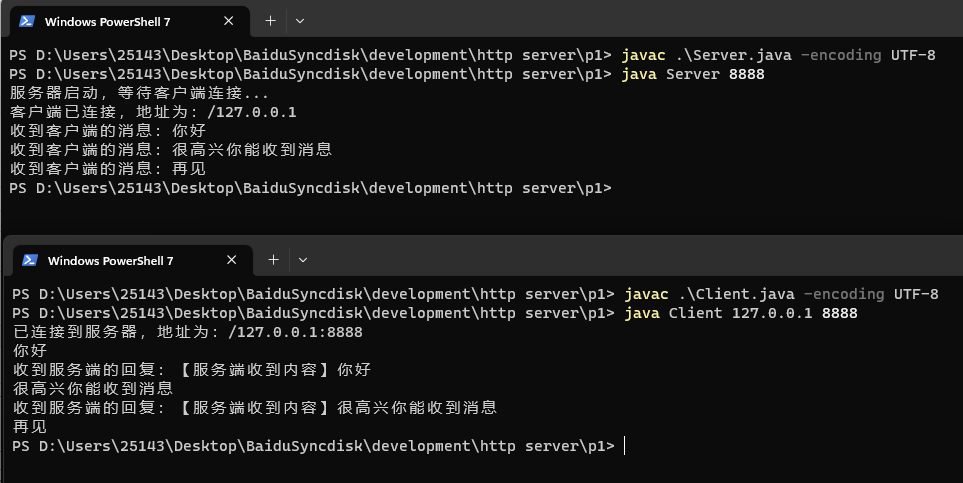
运行服务端,通过参数指定端口,再运行客户端,通过参数指定连接的服务器地址和端口,建立连接后,客户端向服务器端发送消息,服务器端会将收到的内容再发送回客户端,发送消息“再见”会关闭连接。
服务端
import java.io.*;
import java.net.*;

public class Server
{
    public static void main(String[] args) throws IOException
    {
        // 通过命令参数指定端口
        int port = Integer.parseInt(args[0]);
        // 创建一个 ServerSocket 对象
        ServerSocket server_socket = new ServerSocket(port);
        System.out.println("服务器启动,等待客户端连接...");
        // 调用 accept 方法,等待客户端连接
        Socket socket = server_socket.accept();
        System.out.println("客户端已连接,地址为:" + socket.getInetAddress());
        // 获取输入输出流
        BufferedReader in = new BufferedReader(new InputStreamReader(socket.getInputStream()));
        PrintWriter out = new PrintWriter(new OutputStreamWriter(socket.getOutputStream()), true);
        // 使用一个循环,不断地读取和发送消息
        try
        {
            while (true)
            {
                // 读取客户端发送的字符串
                String message = in.readLine();
                System.out.println("收到客户端的消息:" + message);
                // 如果收到“再见”,则结束通信
                if (message.equals("再见"))
                {
                    out.println("再见");
                    break;
                }
                // 否则,向客户端发送“我已收到”后面跟上来自客户端的内容
                out.println("【服务端收到内容】" + message);
            }
        }
        catch (IOException e)
        {
            // 捕获到连接断开的异常
            System.out.println("客户端已断开连接");
        }
        // 关闭资源
        in.close();
        out.close();
        socket.close();
        server_socket.close();
    }
}
客户端
import java.io.*;
import java.net.*;

public class Client
{
    public static void main(String[] args) throws IOException
    {
        // 通过命令参数指定连接地址和端口
        String host = args[0];
        int port = Integer.parseInt(args[1]);
        // 创建一个 Socket 对象
        Socket socket = new Socket(host, port);
        System.out.println("已连接到服务器,地址为:" + socket.getRemoteSocketAddress());
        // 获取输入输出流
        BufferedReader in = new BufferedReader(new InputStreamReader(socket.getInputStream()));
        PrintWriter out = new PrintWriter(new OutputStreamWriter(socket.getOutputStream()), true);
        // 获取控制台输入流
        BufferedReader console = new BufferedReader(new InputStreamReader(System.in));
        // 使用一个循环,不断地读取和发送消息
        while (true)
        {
            // 从控制台读取一个字符串
            String message = console.readLine();
            // 向服务端发送这个字符串
            out.println(message);
            // 如果发送“再见”,则结束通信
            if (message.equals("再见"))
            {
                break;
            }
            // 读取服务端发送的字符串
            String response = in.readLine();
            System.out.println("收到服务端的回复:" + response);
        }
        // 关闭资源
        in.close();
        out.close();
        socket.close();
    }
}
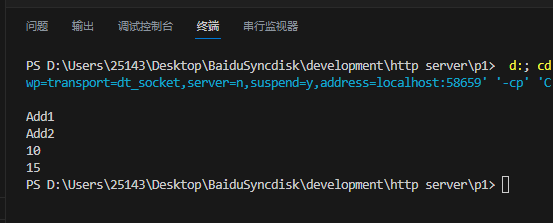
可变参数
2023.9.2
public class Test
{
    public static void main(String[] args)
    {
        System.out.printf("%d\n%d\n",
                            add("Add1", 1, 2, 3, 4),
                            add("Add2", 9, 1, 5));
    }

    // 一个方法只能有一个可变参数,且只能作为最后一个参数
    public static int add(String s, int... nums)
    {
        int sum = 0;
        for (int i = 0; i < nums.length; ++i)
        {
            sum += nums[i];
        }
        System.out.printf("%s\n", s);

        return sum;
    }
}
面向对象
语法上和 C++ 比较相似,C++ 面向对象可以参考:https://blog.iyatt.com/?p=9028
类初步
2023.9.2
class Main
{
    public static void main(String[] args)
    {
        Student s1 = new Student();
        s1.set_student("小强", 20, 99);
        System.out.println("姓名:" + s1.get_student_name()
                            + "\n年龄:" + s1.get_student_age()
                            + "\n成绩:" + s1.get_student_score());
    }
}

class Student
{
    String name;
    int age;
    int score;

    void set_student(String name, int age, int score)
    {
        this.name = name;
        this.age = age;
        this.score = score;
    }

    String get_student_name()
    {
        return this.name;
    }

    int get_student_age()
    {
        return this.age;
    }

    int get_student_score()
    {
        return this.score;
    }
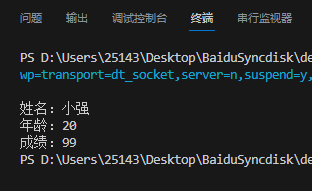
}
重载
2023.9.2
这个和 C++ 一样,函数名相同,而参数类型或者个数不同就可以构成重载。
class Main
{
    static int fun(int a, int b)
    {
        return a + b;
    }

    static void fun(int a)
    {
        System.out.println(a);
    }

    public static void main(String[] args)
    {
        System.out.println(fun(9, 1));
        fun(8);
    }
}
构造方法
2023.9.2
构造方法在类实例化成对象的时候会自动执行,如果没有写构造方法,Java 会自动加一个无参构造方法。构造方法没有返回值,名字和类名一样。如果写了有参构造方法,就不会自动创建无参构造方法了,建议自己加一个无参构造方法避免一些情况下出错。
不过 Java 没有像 C++ 和 Python 那样的析构,虽然有垃圾回收机制,但是执行时机确定。对于文件、网络、数据库之类的操作结束后建议使用try-finally来及时关闭。
class Main
{
    public static void main(String[] args)
    {
        Student s1 = new Student(); // 调用无参构造
        s1.set_student("小强", 20, 99);
        System.out.println("姓名:" + s1.get_student_name()
                            + "\n年龄:" + s1.get_student_age()
                            + "\n成绩:" + s1.get_student_score());

        Student s2 = new Student("小红", 19, 100); // 调用有参构造
        System.out.println("姓名:" + s2.get_student_name()
                            + "\n年龄:" + s2.get_student_age()
                            + "\n成绩:" + s2.get_student_score());
    }
}

class Student
{
    String name;
    int age;
    int score;

    Student() // 无参构造
    {

    }

    Student(String name, int age, int score) // 有参构造
    {
        set_student(name, age, score);
    }

    void set_student(String name, int age, int score)
    {
        this.name = name;
        this.age = age;
        this.score = score;
    }

    String get_student_name()
    {
        return this.name;
    }

    int get_student_age()
    {
        return this.age;
    }

    int get_student_score()
    {
        return this.score;
    }
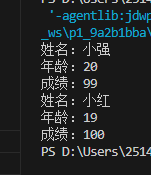
}
封装
2023.9.2
前面写的例子虽然提供了接口来设置和获取成员属性(姓名、年龄、成绩),但这些成员属性是默认权限,在类外但同一个包中其实也是可以直接赋值或者获取值的。封装则是将成员属性保护起来,对成员属性的操作完全只能通过接口(类方法)来操作,在方法中可以对操作加以限制,比如赋值明显不合理的可以进行一定处理,只有合乎要求的才能执行。可以使用 private 修饰成员属性,禁止类外访问。
4 种权限:
| 本类 | 同包 | 非同包子类 | 其它 | |
|---|---|---|---|---|
| private | ✔ | × | × | × |
| 默认 | ✔ | ✔ | × | × |
| protected | ✔ | ✔ | ✔ | × |
| public | ✔ | ✔ | ✔ | ✔ |
class Main
{
    public static void main(String[] args)
    {
        Student s1 = new Student(); // 调用无参构造
        s1.set_student("小强", 20, 99);
        System.out.println("姓名:" + s1.get_student_name()
                            + "\n年龄:" + s1.get_student_age()
                            + "\n成绩:" + s1.get_student_score());

        Student s2 = new Student("小红", 1000, 101); // 调用有参构造
        System.out.println("姓名:" + s2.get_student_name()
                            + "\n年龄:" + s2.get_student_age()
                            + "\n成绩:" + s2.get_student_score());
    }
}

class Student
{
    private String name;
    private int age;
    private int score;

    Student() // 无参构造
    {

    }

    Student(String name, int age, int score) // 有参构造
    {
        set_student(name, age, score);
    }

    void set_student(String name, int age, int score)
    {
        this.name = name;

        if (age > 0 && age < 200)
        {
            this.age = age;
        }
        else
        {
            this.age = -1;
        }

        if (score >= 0 && score <= 100)
        {
            this.score = score;
        }
        else
        {
            this.score = -1;
        }
    }

    String get_student_name()
    {
        return this.name;
    }

    int get_student_age()
    {
        return this.age;
    }

    int get_student_score()
    {
        return this.score;
    }
}
比如这个例子中是无法通过 s1.name=xxxx 直接赋值的,只能通过构造函数或者封装的方法进行设置,获取属性也是一样。另外在设置属性的方法中限制了年龄和成绩的设置范围,如果设置不合理就设置为 -1。
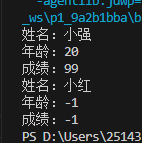
继承
2023.9.2
比如学生和老师其实都是人类,都具有姓名和年龄的属性。这里就抽象出了人类作为父类,定义学生为一个子类,并且继承了父类,同时学生具有一个成绩属性,就定义在学生类里面。如果可以的话,其实还可以定义一个老师类作为子类继承人类,然后老师可以有独有的属性,比如学历、职称等等。在子类中要操作父类属性可以使用 super 代表父类对象。
class Main
{
    public static void main(String[] args)
    {
        Student s = new Student();
        s.set_name("小强");
        s.set_age(20);
        s.set_score(100);
        s.set_test(1);

        System.out.println(s.get_name() + "\n" +
                            s.get_age() + "\n" +
                            s.get_score() + "\n" +
                            s.get_test());
    }
}

// 父类
class Human
{
    // 只能在本类中访问
    private String name;
    private int age;
    // 可以在子类中访问
    protected int test;

    protected void set_name(String name)
    {
        this.name = name;
    }

    protected void set_age(int age)
    {
        this.age = age;
    }

    protected String get_name()
    {
        return this.name;
    }

    protected int get_age()
    {
        return this.age;
    }
}

// 子类
class Student extends Human
{
    private int score;

    public void set_test(int test)
    {
        super.test = test; // 操作父类属性
    }

    public int get_test()
    {
        return super.test;
    }

    public void set_score(int score)
    {
        this.score = score;
    }

    public int get_score()
    {
        return score;
    }
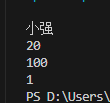
}
重写
2023.9.2
父类有一个方法,在子类中可以对它重写,比如扩增功能。子类重写的方法权限不能小于父类中原先的权限。
比如这里我重写了 get_name,将父类只能获取名字改为名字和年龄一起获取。
class Main
{
    public static void main(String[] args)
    {
        Student s = new Student();
        s.set_name("小强");
        s.set_age(20);

        System.out.println(s.get_name());
    }
}

// 父类
class Human
{
    // 只能在本类中访问
    private String name;
    private int age;

    protected void set_name(String name)
    {
        this.name = name;
    }

    protected void set_age(int age)
    {
        this.age = age;
    }

    protected String get_name()
    {
        return this.name;
    }

    protected int get_age()
    {
        return this.age;
    }
}

// 子类
class Student extends Human
{
    public String get_name()
    {
        return super.get_name() + super.get_age();
    }
}
继承中的构造
2023.9.3
构造方法会在实例化类后第一个执行(自动),子类继承了父类,在示例化子类的时候,会先实例化子类中继承的父类,因此父类的构造方法会先执行,这是没有显式调用父类构造的情况下,Java 自动调用的父类无参构造。如果要调用有参构造(下面第 2 例),将要传递给父类有参构造的参数作为参数给 super 就会调用父类有参构造,且该语句必须放在子类构造方法的第一行位置。
class Main
{
    public static void main(String[] args)
    {
        Student s = new Student();
    }
}

class Human
{
    protected Human()
    {
        System.out.println("执行父类构造");
    }
}

class Student extends Human
{
    public Student()
    {
        System.out.println("执行子类构造");
    }
}
class Main
{
    public static void main(String[] args)
    {
        Student s = new Student("小强", 20, 100);
        System.out.println(s.get());
    }
}

class Human
{
    private String name;
    private int age;

    protected Human()
    {

    }

    protected Human(String name, int age)
    {
        this.name = name;
        this.age = age;
    }

    protected String get()
    {
        return this.name + " " + this.age;
    }
}

class Student extends Human
{
    private int score;

    public Student()
    {

    }

    public Student(String name, int age, int score)
    {
        super(name, age); // 调用父类有参构造
        this.score = score;
    }

    public String get() // 重写父类方法
    {
        return super.get() + " " + this.score;
    }
}
多态
2023.9.3
多态通过将父类对象指向子类对象,实现调用父类对象实际调用子类对象。可以做到接口和实现的分离,对于一些通用的接口由父类统一,具体实现以及后续扩展功能在子类实现,而可以通过父类的统一接口完成不同的功能,也可以调用子类独有的功能。
class Main
{
    static void show(Human h)
    {
        h.whoisme();
        if (h instanceof Student) // 判断对象类型
        {
            ((Student) h).study();
        }
        else if (h instanceof Teacher)
        {
            ((Teacher) h).teach();
        }
    }

    public static void main(String[] args)
    {
        // 使用多态创建对象
        Human s = new Student();
        Human t = new Teacher();

        // 调用子类重写的方法
        s.whoisme();
        t.whoisme();

        // 调用子类特有的方法
        ((Student) s).study();
        ((Teacher) t).teach();

        // 作为参数传递
        show(s);
        show(t);
    }
}

abstract class Human // abstract 修饰为抽象类,无法实例化对象
{
    public void whoisme()
    {
        System.out.println("我是一个人");
    }
}

class Student extends Human
{
    @Override // 重写注解
    public void whoisme()
    {
        System.out.println("我是一名学生");
    }

    public void study()
    {
        System.out.println("我的任务是学习");
    }
}

class Teacher extends Human
{
    @Override
    public void whoisme()
    {
        System.out.println("我是一名老师");
    }

    public void teach()
    {
        System.out.println("我的工作是教书");
    }
}
static
2023.9.3
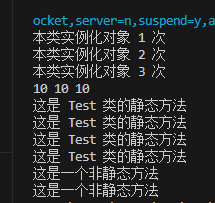
静态的属性和方法是和类本身绑定的,和具体对象无关,通过对象对静态属性操作实际操作的都是同一个属性,也就是类的属性。对于不同类的静态属性或者方法的调用,建议直接使用类名而不是对象,一般支持 Java 语法检测的开发环境都会对使用对象调用静态方法和属性给出警告。另外,静态方法中不能使用 this 和 super(它们和具体对象有关)。
class Main
{
    public static void main(String[] args)
    {
        Test t1 = new Test();
        Test t2 = new Test();
        Test t3 = new Test();

        t1.num = 10;
        System.out.println(t2.num + " " +
                            t3.num + " " +
                            Test.num);
        t1.fun();
        t2.fun();
        t3.fun();
        Test.fun();

        // 静态方法中不能直接调用同类的非静态方法
        // 静态方法伴随类一起创建,但是非静态方法还没有创建,所以无法直接调用
        // 可以先实例化对象再调用
        Main m = new Main();
        m.fun();

        new Main().fun();
    }

    void fun()
    {
        System.out.println("这是一个非静态方法");
    }
}

class Test
{
    static int num;

    public Test()
    {
        ++num;
        System.out.println("本类实例化对象 " + num + " 次");
    }

    static void fun()
    {
        System.out.println("这是 Test 类的静态方法");
    }
}
final
2023.9.3
使用 final 修饰的类不可继承,修饰方法表示方法不能被重写,修饰变量为常量(相当于 C/C++ 中的 const),另外对于常量一般建议使用大写命名,下划线连接。
class Main
{
    public static void main(String[] args)
    {
        final Test1 t = new Test1();
        // t = new Test1(); // final 对象名不能修改指向
    }
}

class Test1
{
    public final void test()
    {

    }

    final int TEST1 = 9;

    public Test1()
    {
        // TEST1 = 10; // final 属性无法修改
    }

    final int TEST2;
    {
        TEST2 = 9; // final 属性可以初始化,之后就无法修改了
    }

    final static int TEST3;

    static // 静态 final 属性要加上这个关键字才能初始化
    {
        TEST3 = 9;
    }
}

final class Test2 extends Test1
{
    // @Override
    // public void test() // 不能重写 final 方法
    // {

    // }
}

// class Test3 extends Test2 // 不可继承 final 类
// {

// }
接口初步
2023.9.3
之前学的语言里面都没有接口这个关键字,但是看了一下,实际上 Java 接口做的事在 C++ 里已经被包含在类里了。
在 Java 8 以前,接口中只能写 public final static 属性和 public abstract 方法,就算不写这些关键字,内部还是会按照这样处理。另外对于接口的命名一般以 I 开头或者 able 结尾。
初步可以把接口当作抽象父类,这里就用前面多态的示例代码改写,将父类用接口实现,这部分类似 C++ 的纯虚函数。注意子类中重写的方法必须是 public,因为接口中默认是 public,不能减小访问权限。
class Main
{
    static void show(IHuman h)
    {
        h.whoisme();
        if (h instanceof Student) // 判断对象类型
        {
            ((Student) h).study();
        }
        else if (h instanceof Teacher)
        {
            ((Teacher) h).teach();
        }
    }

    public static void main(String[] args)
    {
        // 使用多态创建对象
        IHuman s = new Student();
        IHuman t = new Teacher();

        // 调用子类重写的方法
        s.whoisme();
        t.whoisme();

        // 调用子类特有的方法
        ((Student) s).study();
        ((Teacher) t).teach();

        // 作为参数传递
        show(s);
        show(t);
    }
}

interface IHuman
{
    void whoisme();
}

class Student implements IHuman // 实现接口
{
    @Override // 重写注解
    public void whoisme()
    {
        System.out.println("我是一名学生");
    }

    public void study()
    {
        System.out.println("我的任务是学习");
    }
}

class Teacher implements IHuman
{
    @Override
    public void whoisme()
    {
        System.out.println("我是一名老师");
    }

    public void teach()
    {
        System.out.println("我的工作是教书");
    }
}
多继承
2023.9.3
C++ 的类支持多继承,而 Java 的类不能,但是可以使用接口实现多继承。且接口和接口之间也可以实现多继承。
class Main
{
    public static void main(String[] args)
    {
        ISing is = new Speciality1();
        is.sing();
        ((IDance) is).dance();

        IDance id = new Speciality1();
        ((ISing) id).sing();
        id.dance();

        Speciality2 s = new Speciality2();
        s.sing();
        s.dance();
    }
}

interface ISing
{
    void sing();
}

interface IDance
{
    void dance();
}

interface ISpeciality extends ISing, IDance
{

}

class Speciality1 implements ISing, IDance
{
    @Override
    public void sing()
    {
        System.out.println("唱歌1");
    }

    @Override
    public void dance()
    {
        System.out.println("跳舞1");
    }
}

class Speciality2 implements ISpeciality
{
    @Override
    public void sing()
    {
        System.out.println("唱歌2");
    }

    @Override
    public void dance()
    {
        System.out.println("跳舞2");
    }
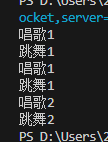
}
常量应用
2023.9.3
一般在开发中不建议直接使用常量值,而是通过常变量来保存值,这样可以提高程序的可读性,那么就可以利用接口变量自带 public final static 特性,将要使用的常量都写到接口中,使用者继承这个接口就行。
标准应用
2023.9.3
interface 一般是用于规范接口,实现标准化。这里就用 USB 来举例,USB 本身就是一种标准的接口,在电脑上提供了 USB 的接口,对于外部设备,如 U pan、打印机也是使用 USB 接口进行通信,将这样的规定作为标准。这样各种外设厂家的产品只要适配 USB,而电脑只要都提供 USB,那么就可以通用使用了,而不是各自做各自的,每种设备一种接口,那这样电脑也需要各种接口来适配,使用起来也不方便。
class Main
{
    public static void main(String[] args)
    {
        Computer c = new Computer();

        c.usb = new Disk();
        c.usb.service();

        c.usb = new Printer();
        c.usb.service();
    }
}

interface IUSB
{
    void service();
}

class Computer
{
    IUSB usb;
}

class Disk implements IUSB
{
    @Override
    public void service()
    {
        System.out.println("使用磁盘");
    }
}

class Printer implements IUSB
{
    @Override
    public void service()
    {
        System.out.println("使用打印机");
    }
}
Object 类
2023.9.3
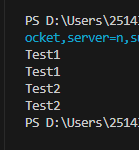
实际上自己写的类都会从 Object 类继承,比如下面的例子继承 Object 中封装的方法,用于获取类名。
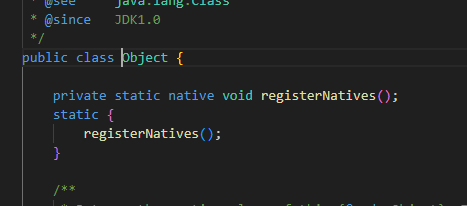
class Main
{
    public static void main(String[] args)
    {
        Test1 t1 = new Test1();
        System.out.println(t1.getClass().getName() + "\n" + // 全称
                            t1.getClass().getSimpleName()); // 简称

        Test2 t2 = new Test2();
        System.out.println(t2.getClass().getName() + "\n" + // 全称
                            t2.getClass().getSimpleName()); // 简称

    }
}

class Test1
{

}

class Test2 extends Object
{

}
接口的默认方法和静态方法
2023.9.3
从 Java 8 开始,接口除了前面说到的两种,还可以写 default(默认)方法和 static(静态)方法。
默认方法可以提供默认的实现,如果子类没有重写,那么就执行默认方法。
/**
 * 默认方法
 */
class Main
{
    public static void main(String[] args)
    {
        IAnimal ia = new Dog();
        ia.make_sound();
        ia.move();
    }
}

interface IAnimal
{
    default void make_sound()
    {
        System.out.println("动物发出声音");
    }

    default void move()
    {
        System.out.println("动物移动");
    }
}

class Dog implements IAnimal
{
    @Override
    public void make_sound()
    {
        System.out.println("狗在叫");
    }
}
静态方法可以不用实例对象,直接通过接口名调用,和类静态方法一样。
/**
 * 静态方法
 */
class Main
{
    public static void main(String[] args)
    {
        Calculator add = Calculator.create("add");
        Calculator sub = Calculator.create("sub");
        Calculator mul = Calculator.create("mul");
        Calculator div = Calculator.create("div");

        System.out.println("10 + 5 = " + add.calculate(10, 5));
        System.out.println("10 - 5 = " + sub.calculate(10, 5));
        System.out.println("10 * 5 = " + mul.calculate(10, 5));
        System.out.println("10 / 5 = " + div.calculate(10, 5));
    }
}

interface Calculator
{
    // 抽象方法
    double calculate(double x, double y);

    // 静态方法
    static Calculator create(String type)
    {
        switch (type)
        {
            case "add":
            {
                return (x, y) -> x + y; // Lambda 表达式
            }
            case "sub":
            {
                return (x, y) -> x - y;
            }
            case "mul":
            {
                return (x, y) -> x * y;
            }
            case "div":
            {
                return (x, y) -> x / y;
            }
            default:
            {
                return null;
            }
        }
    }
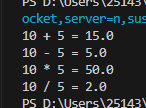
}
匿名类
2023.9.7
class Main
{
    public static void main(String[] args)
    {
        // 创建一个匿名类
        ITest t1 = new ITest()
        {
            @Override
            public void show()
            {
                System.out.println("Hello world");
            }

            @Override
            public void show(String str)
            {
                System.out.println(str);
            }
        };

        t1.show();
        t1.show("world hello");
    }
}

interface ITest
{
    void show();
    void show(String str);
}
回调
2023.9.7
回调的思想,可以先标准化方法原型,然后使用者自行定义功能。比如 Java 里的线程提供了一个 Runnable 接口,可以自行实现需要的功能,然后调用线程执行。
class Main
{
    public static void main(String[] args)
    {
        // 通过匿名类来实现功能逻辑
        Test t = new Test(new ICallback()
        {
            @Override
            public void show(String str)
            {
                System.out.println(str);
            }
        });

        t.execute("hello world");
    }
}

// 回调接口
interface ICallback
{
    void show(String str);
}

class Test
{
    private ICallback callback;

    public Test(ICallback callback)
    {
        this.callback = callback;
    }

    public void execute(String str)
    {
        for (int i = 0; i < 3; ++i)
        {
            callback.show(str);
        }
    }
}
泛型
初步使用
2023.9.4
Java 中提供了一些泛型的封装,比如动态数组,可以支持各种类型,注意不能使用基本数据类型,要使用这些数据类型就得用它们的包装类。
| 基本数据类型 | 包装类 |
|---|---|
| byte | Byte |
| short | Short |
| int | Integer |
| long | Long |
| float | Float |
| double | Double |
| char | Character |
| boolean | Boolean |
import java.util.ArrayList;

class Main
{
    public static void main(String[] args)
    {
        // 存放内置数据类型
        ArrayList<Integer> array = new ArrayList<>();
        array.add(9);
        array.add(8);
        array.add(7);
        for (Integer i : array)
        {
            System.out.println(i);
        }

        // 存放自定义类
        ArrayList<Student> s = new ArrayList<>();
        s.add(new Student("小强", 20));
        s.add(new Student("小红", 19));
        for (Student i : s)
        {
            System.out.println(i);
        }
    }
}

class Student
{
    public String name;
    public int age;

    public Student(String name, int age)
    {
        this.name = name;
        this.age = age;
    }

    @Override
    public String toString() // 重写这个方法后可以直接打印输出
    {
        return "Student 【name=" + this.name + ", age=" + this.age + " 】";
    }
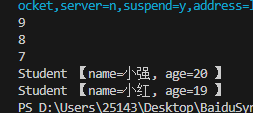
}
泛型类
2023.9.4
一些约定俗成的泛型标识(实际没有强制使用什么标识,也不限于一个字符)
| 泛型标识 | 含义 | 应用场景 |
|---|---|---|
| E | Element(元素) | 在集合中使用,表示集合中存放的元素类型 |
| T | Type(类型) | 一般用于泛型类或泛型方法,表示一个自定义的类型 |
| K | Key(键) | 在映射中使用,表示映射中的键的类型 |
| V | Value(值) | 在映射中使用,表示映射中的值的类型 |
| N | Number(数字) | 在数值操作中使用,表示一个数值类型 |
| ? | Wildcard(通配符) | 表示一个未知的类型,用于限定泛型的上界或下界 |
class Main
{
    public static void main(String[] args)
    {
        Test<Integer> t1 = new Test<>();
        t1.set_value(10);
        System.out.println(t1);

        Test<String> t2 = new Test<>("Hello");
        System.out.println(t2.get_value());
        System.out.println(t2);
    }
}

class Test<T>
{
    private T value;

    public Test()
    {

    }

    public Test(T value)
    {
        this.value = value;
    }

    public void set_value(T value)
    {
        this.value = value;
    }

    public T get_value()
    {
        return this.value;
    }

    @Override
    public String toString()
    {
        return "Test {value=" + this.value + "}";
    }
}
继承中的泛型
2023.9.3
class Main
{
    public static void main(String[] args)
    {
        Test2<Integer> t1 = new Test2<>();
        t1.set_value(9);
        System.out.println(t1.get_value());

        Test2<String> t2 = new Test2<>("Hello");
        System.out.println(t2.get_value());

        Test3 t3 = new Test3();
        System.out.println(t3.get_value());
    }
}

class Test1<A>
{
    protected A value;
}

class Test2<B> extends Test1<B> // 标识可以和父类定义中不同,但是这里前后必须一样,代表同一种类型
{
    public Test2()
    {

    }

    public Test2(B value)
    {
        super.value = value;
    }

    public void set_value(B value)
    {
        super.value = value;
    }

    public B get_value()
    {
        return super.value;
    }
}

class Test3 extends Test1<Integer> // 子类不使用泛型,则父类的标识要指定类型
{
    public Test3()
    {
        super.value = 1;
    }

    public Integer get_value()
    {
        return super.value;
    }
}

class Test4<T1,T2> extends Test1<String> // 子类不使用父类的泛型,则要指定父类标识为确定类型
{

}

class Test5<T1,T2> extends Test1<T1> // 子类使用多个泛型,且使用到父类泛型的情况
{

}
泛型接口
2023.9.4
泛型接口和泛型类使用方法差不多
class Main
{
    public static void main(String[] args)
    {
        Person p1 = new Person("小强", 20);
        Person p2 = new Person("小红", 17);
        System.out.println(p1.compare(p2));

        Student s1 = new Student("小张", 78);
        Student s2 = new Student("小王", 100);
        System.out.println(s1.compare(s2));
    }
}

interface ICompare<T>
{
    int compare(T o);
}

class Person implements ICompare<Person>
{
    private String name;
    private int age;

    public Person()
    {

    }

    public Person(String name, int age)
    {
        this.name = name;
        this.age = age;
    }

    public int get_age()
    {
        return this.age;
    }

    @Override
    public int compare(Person o)
    {
        return this.age - o.age;
    }
}

class Student implements ICompare<Student>
{
    private String name;
    private int score;

    public Student()
    {

    }

    public Student(String name, int score)
    {
        this.name = name;
        this.score = score;
    }

    public int get_score()
    {
        return this.score;
    }

    @Override
    public int compare(Student o)
    {
        return this.score - o.get_score();
    }
}
泛型方法
2023.9.4
class Main
{
    public static void main(String[] args)
    {
        Integer[] a = {1, 2};
        print(a);
        swap(a);
        print(a);

        String[] b = {"hello", "world"};
        print(b);
        swap(b);
        print(b);

    }

    static <T> void swap(T[] array) // 泛型方法,交换
    {
        T tmp = array[0];
        array[0] = array[1];
        array[1] = tmp;
    }

    static <T> void print(T[] array) // 泛型方法,打印输出
    {
        System.out.println(array[0] + " " + array[1]);
    }
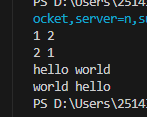
}
类型通配符
无界通配符
2023.9.4
class Main
{
    public static void main(String[] args)
    {
        Box<Integer> int_box = new Box<>();
        int_box.set(10);
        print_box(int_box);

        Box<String> str_box = new Box<>();
        str_box.set("hello");
        print_box(str_box);
    }

    static void print_box(Box<?> object) // 使用 ? 作为标识
    {
        System.out.println(object.get());
    }
}

class Box<T>
{
    private T object;

    public void set(T object)
    {
        this.object = object;
    }

    public T get()
    {
        return this.object;
    }
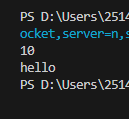
}
上界通配符
2023.9.5
上界通配符有了上限限制,泛型的类型只能在一定范围内。无界通配符其实是默认把 Object 作为上界,也就是支持所有 Java 类。
class Main
{
    public static void main(String[] args)
    {
        Box<Integer> int_box = new Box<>();
        int_box.set(10);
        print_box(int_box);

        Box<Float> float_box = new Box<>();
        float_box.set(9.5f);
        print_box(float_box);

        Box<String> str_box = new Box<>();
        str_box.set("hello");
        // print_box(str_box); // String 超出了上限,不是 Number 的子类
    }

    // 增加了上限,比如这里泛型只能是 Number 或 Number 的子类
    // Byte、Short、Integer、Long、Float、Double
    static void print_box(Box<? extends Number> object)
    {
        System.out.println(object.get());
    }
}

class Box<T>
{
    private T object;

    public void set(T object)
    {
        this.object = object;
    }

    public T get()
    {
        return this.object;
    }
}
下界通配符
2023.9.5
下界通配符可以这样理解:假如先有一个动物类,然后派生出了猫和狗,如果将狗作为下界,那么泛型就可以匹配为狗,以及再往上的动物,但是却不能匹配为猫,即将狗作为下界,沿着它的父类往上可以匹配。
class Main
{
    public static void main(String[] args)
    {
        Dog dog = new Dog();

        Box<Dog> dog_box = new Box<>();
        print_box(dog, dog_box);

        Box<Cat> cat_box = new Box<>();
        // print_box(dog, cat_box); // 狗不能放进猫 Box

        Box<Animal> animal_box = new Box<>();
        print_box(dog, animal_box);
    }

    static void print_box(Dog dog, Box<? super Dog> box) // 下界通配符,狗可以放到狗 Box 和 动物 Box 里,但是不能放进猫 Box 里
    {
        box.set(dog);
        box.get().show();
    }
}

class Animal
{
    public void show()
    {
        System.out.println("这是动物");
    }
}

class Dog extends Animal
{
    @Override
    public void show()
    {
        System.out.println("这是狗");
    }
}

class Cat extends Animal
{
    @Override
    public void show()
    {
        System.out.println("这是猫");
    }
}

class Box<T extends Animal> // 将 Animal 作为上限,而不是 Object
{
    private T object;

    public void set(T object)
    {
        this.object = object;
    }

    public T get()
    {
        return this.object;
    }
}
异常
异常捕获
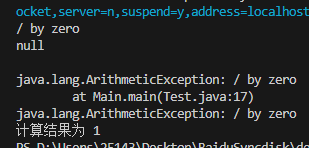
程序发生异常的时候会直接崩溃退出,但如果加上异常处理,则可以将发生的异常捕获到,能够针对发生的不同异常进行处理,使程序最终可以正常运行。C++ 和 Python 也都有这种机制。异常机制也可以在程序调试的时候帮助找出一些问题。
2023.9.5
class Main
{
    public static void main(String[] args)
    {
        int i = 10;
        int j = 0;
        int m = 0;

        try // 可能出现异常的代码
        {
            // 抛出异常 - 手动
            // if (j == 0)
            // {
            //     throw new Exception("/ by zero");
            // }

            m = i / j; // 除数为 0 的运算
        }
        catch (Exception e) // 捕获到异常,可以在这里处理
        {
            System.out.println(e.getMessage() + "\n" + // 异常消息
                                e.getCause() + "\n"); // 异常原因

            e.printStackTrace(); // 将异常打印到标准错误流
            System.out.println(e); // toString 方法,异常的简述

            // 纠正错误
            j = 10;
            m = i / j;
        }
        finally // 不管有无异常都会执行
        {
            System.out.println("计算结果为 " + m);
        }
    }
}
常见异常
2023.9.5
class Main
{
    public static void main(String[] args)
    {
        try
        {
            // 算术异常
            int m = 9 / 0; // 除数为零

            // 空指针异常
            String s = null;
            System.out.println(s);

            // 数组索引越界异常
            String[] str_array = new String[2]; // 大小为 2
            str_array[2] = "dadasd"; // 但是却在第 3 个索引处尝试写入

            // 字符串索引越界
            String s1 = "abcd"; // 4 个字符的字符串
            System.out.println(s1.charAt(4)); // 尝试访问第 5 个索引位置

            // 数字格式化异常
            String s2 = "a123";
            Integer integer = Integer.parseInt(s2); // 将非数字字符串转为数字

            // 类型转换错误
            Object obj = new Test1();
            Test2 test = (Test2)obj;
        }
        catch (ArithmeticException e) // 算术异常
        {
            System.out.println(e);
        }
        catch (NullPointerException e) // 空指针异常
        {
            System.out.println(e);
        }
        catch (ArrayIndexOutOfBoundsException e) // 数组索引越界异常
        {
            System.out.println(e);
        }
        catch (StringIndexOutOfBoundsException e) // 字符串索引越界
        {
            System.out.println(e);
        }
        catch (NumberFormatException e) // 数字格式化异常
        {
            System.out.println(e);
        }
        catch (ClassCastException e) // 类型转换错误
        {
            System.out.println(e);
        }
    }
}

class Test1
{

}

class Test2
{

}
自定义异常
2023.9.5
class Main
{
    public static void main(String[] args)
    {
        String account = "admin";
        String password = "passw";

        try
        {
            login(account, password);
        }
        catch (AccountException e)
        {
            e.printStackTrace();
            System.out.println("请重新输入账号!");
        }
        catch (PasswordException e)
        {
            e.printStackTrace();;
            System.out.println("请重新输入密码!");
        }
    }

    static void login(String account, String password) throws AccountException, PasswordException // 声明该方法可能抛出的异常(告知调用者)
    {
        if (!"admin".equals(account))
        {
            throw new AccountException("账号不正确!");
        }
        if (!"passwd".equals(password))
        {
            throw new PasswordException("密码不正确!");
        }
        System.out.println("登录成功");
    }
}

class LoginException extends RuntimeException
{
    public LoginException(String message)
    {
        super(message);
    }
}

class AccountException extends LoginException
{
    public AccountException(String messgae)
    {
        super(messgae);
    }
}

class PasswordException extends LoginException
{
    public PasswordException(String message)
    {
        super(message);
    }
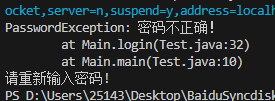
}
常见异常继承关系
2023.9.16
Throwable
├── Error
│   ├── OutOfMemoryError
│   ├── StackOverflowError
│   ├── VirtualMachineError
│   ├── LinkageError
│   │   ├── ClassCircularityError
│   │   ├── ClassFormatError
│   │   ├── IncompatibleClassChangeError
│   │   ├── NoSuchFieldError
│   │   └── NoSuchMethodError
│   ├── InternalError
│   ├── UnknownError
│   └── UnsatisfiedLinkError
└── Exception
    ├── IOException
    │   ├── EOFException
    │   ├── FileNotFoundException
    │   ├── SocketException
    │   └── ...
    ├── RuntimeException
    │   ├── ArithmeticException
    │   ├── NullPointerException
    │   ├── IndexOutOfBoundsException
    │   │   ├── ArrayIndexOutOfBoundsException
    │   │   └── StringIndexOutOfBoundsException
    │   ├── ClassCastException
    │   ├── IllegalArgumentException
    │   ├── IllegalStateException
    │   ├── IllegalThreadStateException
    │   └── ...
    ├── SQLException
    ├── ClassNotFoundException
    ├── CloneNotSupportedException
    ├── IllegalAccessException
    ├── InstantiationException
    ├── InterruptedException
    └── ...
IO
写文件
2023.9.6
import java.io.*;

class Main
{
    public static void main(String[] args)
    {
        String content = "Hello world"; // 要写入文件的内容
        String file_name = "test1.txt"; // 目标文件名

        File file = new File(file_name); // 创建文件对象
        FileWriter writer = null; // 文件写入对象

        try
        {
            if (!file.exists()) // 不存在就创建文件
            {
                file.createNewFile();
            }

            writer = new FileWriter(file, false); // 创建写文件对象并关联到文件对象,非追加模式
            writer.write(content); // 写入
            writer.flush(); // 将写入到缓冲区的数据刷新到文件

            System.out.println("写入完成");
        }
        catch (IOException e)
        {
            e.printStackTrace();
        }
        finally
        {
            try
            {
                if (writer != null) // 关闭写文件对象
                {
                    writer.close();
                }
            }
            catch (IOException e)
            {
                e.printStackTrace();
            }
        }

    }
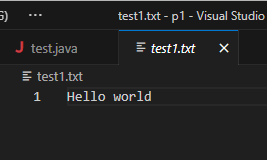
}
复制文件内容
2023.9.6
import java.io.*;

class Main
{
    public static void main(String[] args)
    {
        String src_file_name = "test1.txt"; // 源文件
        String dest_file_name = "test2.txt"; // 目标文件

        File src_file = new File(src_file_name);
        File dest_file = new File(dest_file_name);

        FileInputStream input = null;
        FileOutputStream output = null;

        try
        {
            input = new FileInputStream(src_file); // 将文件输入流和打开的源文件对象关联
            output = new FileOutputStream(dest_file); // 将文件输出流和打开的目标文件对象关联

            for (int data = input.read(); data != -1; data = input.read()) // 从文件输入流读入,再写入文件输出流
            {
                output.write(data);
            }
        }
        catch (IOException e)
        {
            e.printStackTrace();
        }
        finally
        {
            try
            {
                if (input != null)
                {
                    input.close();
                }
                if (output != null)
                {
                    output.close();
                }
            }
            catch (IOException e)
            {
                e.printStackTrace();
            }
        }
    }
}
缓冲
2023.9.6
前面的文件内容复制是打开一次输入流读取一个字符,打开一输出流写入一个字符,可能效率会比较低。那么就可以使用缓冲,一次性读取一定量的数据,再一次性写入。
在前面文件内容复制代码的基础上修改,将一次读取一个字符改为读取一定量的。
import java.io.*;

class Main
{
    public static void main(String[] args)
    {
        String src_file_name = "test1.txt"; // 源文件
        String dest_file_name = "test2.txt"; // 目标文件

        File src_file = new File(src_file_name);
        File dest_file = new File(dest_file_name);

        FileInputStream input = null;
        FileOutputStream output = null;

        try
        {
            input = new FileInputStream(src_file); // 将文件输入流和打开的源文件对象关联
            output = new FileOutputStream(dest_file); // 将文件输出流和打开的目标文件对象关联
            byte[] buffer = new byte[1024]; // 1KB 缓冲区

            for (int length = input.read(buffer); length != -1; length = input.read(buffer)) // 从文件输入流读入,再写入文件输出流
            {
                output.write(buffer, 0, length);
                output.flush();
            }
        }
        catch (IOException e)
        {
            e.printStackTrace();
        }
        finally
        {
            try
            {
                if (input != null)
                {
                    input.close();
                }
                if (output != null)
                {
                    output.close();
                }
            }
            catch (IOException e)
            {
                e.printStackTrace();
            }
        }
    }
}
另外一种实现是使用 Java 的缓冲流
import java.io.*;

class Main
{
    public static void main(String[] args)
    {
        String src_file_name = "test1.txt"; // 源文件
        String dest_file_name = "test2.txt"; // 目标文件

        File src_file = new File(src_file_name);
        File dest_file = new File(dest_file_name);

        FileInputStream input = null;
        FileOutputStream output = null;

        BufferedInputStream buffer_input = null;
        BufferedOutputStream buffer_output = null;

        try
        {
            input = new FileInputStream(src_file); // 将文件输入流和打开的源文件对象关联
            output = new FileOutputStream(dest_file); // 将文件输出流和打开的目标文件对象关联
            buffer_input = new BufferedInputStream(input); // 将缓冲输入流和文件输入流关联
            buffer_output = new BufferedOutputStream(output); // 将缓冲输出流和文件输出流关联
            byte[] buffer = new byte[1024]; // 1KB 缓冲区

            for (int length = buffer_input.read(buffer); length != -1; length = buffer_input.read(buffer)) // 从文件输入流读入,再写入文件输出流
            {
                buffer_output.write(buffer, 0, length);
                buffer_output.flush();
            }
        }
        catch (IOException e)
        {
            e.printStackTrace();
        }
        finally
        {
            try
            {
                if (input != null)
                {
                    input.close();
                }
                if (output != null)
                {
                    output.close();
                }
                if (buffer_input != null)
                {
                    buffer_input.close();
                }
                if (buffer_output != null)
                {
                    buffer_output.close();
                }
            }
            catch (IOException e)
            {
                e.printStackTrace();
            }
        }
    }
}
线程
线程状态
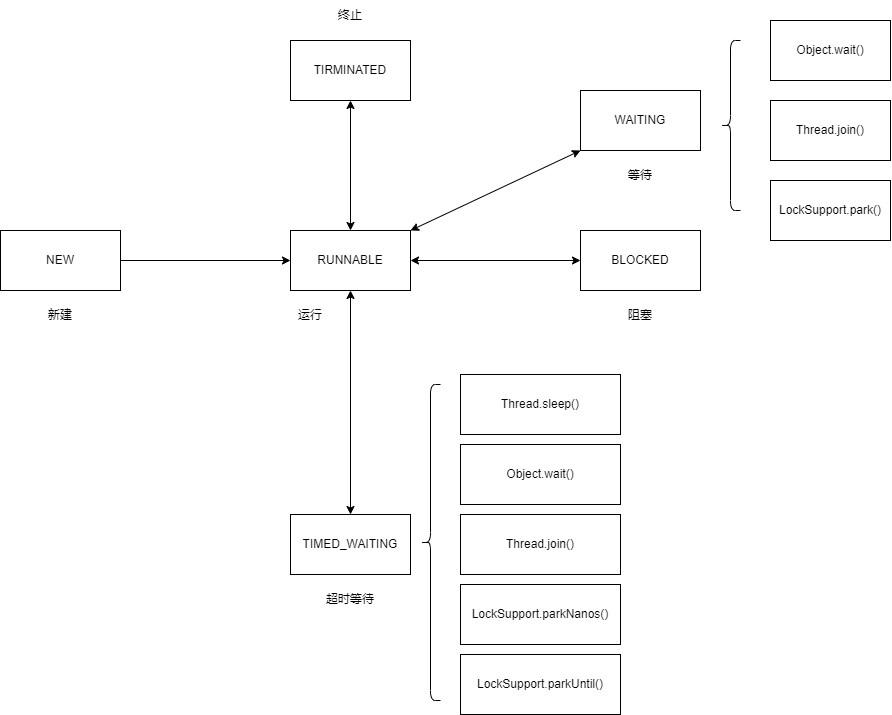
简单多线程
2023.9.7
class Main
{
    public static void main(String[] arsg)
    {
        System.out.println("主线程开始执行");
        System.out.println("主线程名字为:" + Thread.currentThread().getName());

        MyThread thread = new MyThread();
        thread.start();
        try
        {
            thread.join();
        }
        catch (InterruptedException e)
        {
            e.printStackTrace();
        }

        System.out.println("主程序执行结束");
    }
}

class MyThread extends Thread
{
    @Override
    public void run()
    {
        System.out.println("子线程开始执行");
        System.out.println("子线程名字为:" + Thread.currentThread().getName());

        try
        {
            Thread.sleep(5000); // 休眠 5 秒模拟子线程耗时操作
        }
        catch (InterruptedException e)
        {
            e.printStackTrace();
        }

        System.out.println("子线程结束");
    }
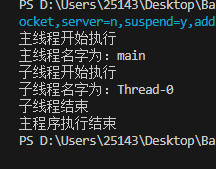
}
Lambda 表达式
2023.9.7
class Main
{
    public static void main(String[] args)
    {
        System.out.println("主线程开始执行");

        // 使用 Lambda 表达式传入执行逻辑
        Thread t1 = new Thread(() ->
        {
            System.out.println("子线程开始执行");
            System.out.println("本线程名字为:" + Thread.currentThread().getName());
            System.out.println("子线程结束");
        });

        t1.start();

        try
        {
            t1.join(); // 等待子线程运行完成
        }
        catch (InterruptedException e)
        {
            e.printStackTrace();
        }

        System.out.println("主线程结束");
    }
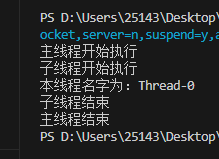
}
Runnable 匿名类
2023.9.7
class Main
{
    public static void main(String[] args)
    {
        System.out.println("主线程开始执行");

        Thread t1 = new Thread(new Runnable()
        {
            @Override
            public void run()
            {
                System.out.println("子线程开始执行");
                System.out.println("本线程名字为:" + Thread.currentThread().getName());
                System.out.println("子线程");
            }
        });

        t1.start();

        try
        {
            t1.join(); // 等待子线程运行完成
        }
        catch (InterruptedException e)
        {
            e.printStackTrace();
        }

        System.out.println("主线程结束");
    }
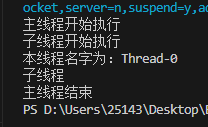
}
线程池
固定线程数
2023.9.7
import java.util.concurrent.ExecutorService;
import java.util.concurrent.Executors;
import java.util.concurrent.TimeUnit;

class Main
{
    public static void main(String[] args)
    {
        // 创建 3 个线程
        ExecutorService es = Executors.newFixedThreadPool(3);

        // 向线程池提交 5 个任务
        for (int i = 0; i < 5; ++i)
        {
            es.submit(new Runnable()
            {
                @Override
                public void run()
                {
                    System.out.println("线程 " + Thread.currentThread().getName() + " 开始执行");
                    try
                    {
                        Thread.sleep(2000); // 休眠 2 秒
                    }
                    catch (InterruptedException e)
                    {
                        e.printStackTrace();
                    }
                    System.out.println("线程 " + Thread.currentThread().getName() + " 结束");
                }
            });
        }

        // 停止添加新任务,等待线程完成工作后关闭线程池
        es.shutdown();

        // 等待线程池中所有线程结束工作
        try
        {
            es.awaitTermination(Long.MAX_VALUE, TimeUnit.SECONDS);
        }
        catch (InterruptedException e)
        {
            e.printStackTrace();
        }

        System.out.println("主线程结束");
    }
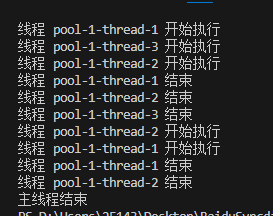
}
动态线程数
2023.9.7
import java.util.concurrent.ExecutorService;
import java.util.concurrent.Executors;
import java.util.concurrent.TimeUnit;

class Main
{
    public static void main(String[] args)
    {
        // 动态创建线程
        ExecutorService es = Executors.newCachedThreadPool();

        // 向线程池提交 20 个任务
        for (int i = 0; i < 20; ++i)
        {
            es.submit(new Runnable()
            {
                @Override
                public void run()
                {
                    System.out.println("线程 " + Thread.currentThread().getName() + " 开始执行");
                    System.out.println("线程 " + Thread.currentThread().getName() + " 结束");
                }
            });
        }

        // 停止添加新任务,等待线程完成工作后关闭线程池
        es.shutdown();

        // 等待线程池中所有线程结束工作
        try
        {
            es.awaitTermination(Long.MAX_VALUE, TimeUnit.SECONDS);
        }
        catch (InterruptedException e)
        {
            e.printStackTrace();
        }

        System.out.println("主线程结束");
    }
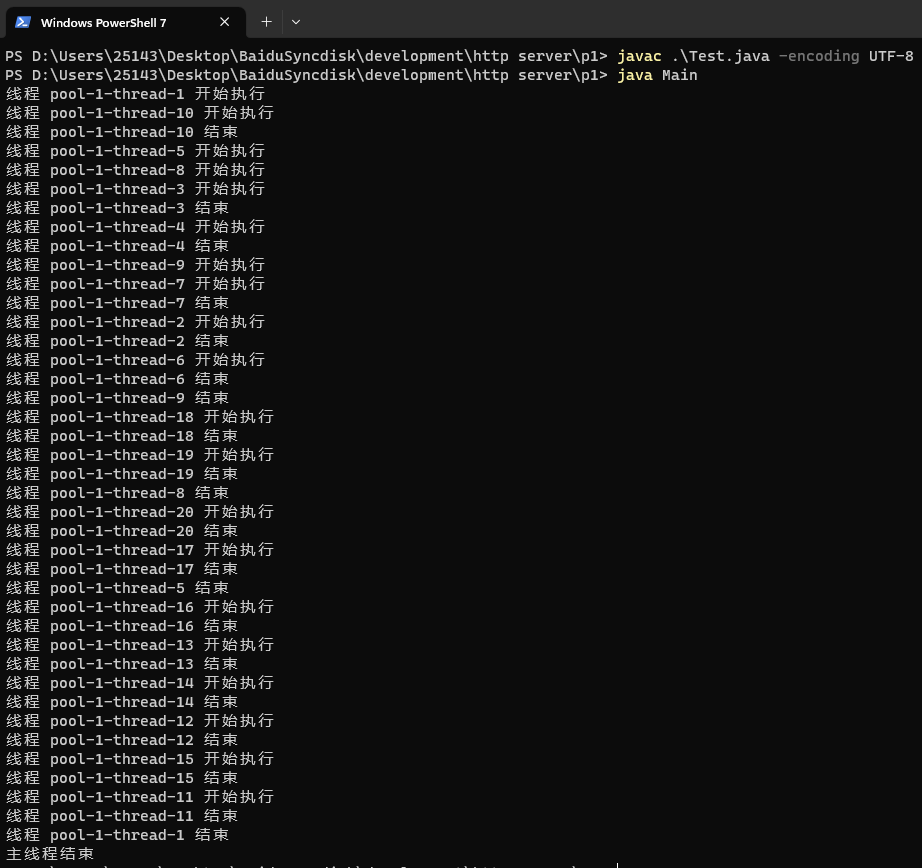
}
单一线程
2023.9.7
import java.util.concurrent.ExecutorService;
import java.util.concurrent.Executors;
import java.util.concurrent.TimeUnit;

class Main
{
    public static void main(String[] args)
    {
        // 单一线程
        ExecutorService es = Executors.newSingleThreadExecutor();

        // 向线程池提交 5 个任务
        for (int i = 0; i < 5; ++i)
        {
            es.submit(new Runnable()
            {
                @Override
                public void run()
                {
                    System.out.println("线程 " + Thread.currentThread().getName() + " 开始执行");
                    System.out.println("线程 " + Thread.currentThread().getName() + " 结束");
                }
            });
        }

        // 停止添加新任务,等待线程完成工作后关闭线程池
        es.shutdown();

        // 等待线程池中所有线程结束工作
        try
        {
            es.awaitTermination(Long.MAX_VALUE, TimeUnit.SECONDS);
        }
        catch (InterruptedException e)
        {
            e.printStackTrace();
        }

        System.out.println("主线程结束");
    }
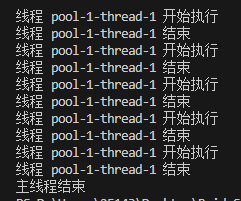
}
定时调度线程
2023.9.7
import java.util.concurrent.Executors;
import java.util.concurrent.ScheduledExecutorService;
import java.util.concurrent.ScheduledFuture;
import java.util.concurrent.TimeUnit;

class Main
{
    public static void main(String[] args)
    {
        // 单线程定时调度
        ScheduledExecutorService es = Executors.newSingleThreadScheduledExecutor();
        // 提交一个任务,每秒打印一次当前时间秒数
        ScheduledFuture<?> sf = es.scheduleAtFixedRate(new Runnable()
        {
            @Override
            public void run()
            {
                System.out.println(System.currentTimeMillis());
            }
        },
        0, 1, TimeUnit.SECONDS);

        try
        {
            Thread.sleep(4000);
        }
        catch (InterruptedException e)
        {
            e.printStackTrace();
        }
        sf.cancel(true); // 取消任务
        es.shutdown(); // 关闭线程池

        // 等待线程池中所有线程结束工作
        try
        {
            es.awaitTermination(Long.MAX_VALUE, TimeUnit.SECONDS);
        }
        catch (InterruptedException e)
        {
            e.printStackTrace();
        }

        System.out.println("主线程结束");
    }
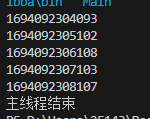
}
线程命名
import java.util.concurrent.ExecutorService;
import java.util.concurrent.Executors;
import java.util.concurrent.ThreadFactory;
import java.util.concurrent.TimeUnit;

class Main
{
    public static void main(String[] args)
    {
        // 给线程设置名称
        ThreadFactory tf = new ThreadFactory()
        {
            private int counter = 0;

            @Override
            public Thread newThread(Runnable r)
            {
                switch (counter++)
                {
                    case 0:
                    {
                        return new Thread(r, "第一个线程");
                    }
                    case 1:
                    {
                        return new Thread(r, "第二个线程");
                    }
                    case 2:
                    {
                        return new Thread(r, "第三个线程");
                    }
                    default:
                    {
                        return null;
                    }
                }
            }
        };

        // 创建一个有 3 个线程的线程池
        ExecutorService es = Executors.newFixedThreadPool(3, tf);

        // 提交三个任务
        for (int i = 0; i < 3; ++i)
        {
            es.execute(new Runnable()
            {
                @Override
                public void run()
                {
                    Thread t = Thread.currentThread(); // 获取当前线程的引用
                    System.out.println("线程名称:" + t.getName() + "," +
                                        "线程状态:" + t.getState());
                }
            });
        }

        es.shutdown(); // 关闭线程池

        // 等待线程池中所有线程结束工作
        try
        {
            es.awaitTermination(Long.MAX_VALUE, TimeUnit.SECONDS);
        }
        catch (InterruptedException e)
        {
            e.printStackTrace();
        }

        System.out.println("主线程结束");
    }
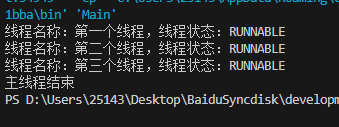
}
传参
构造
2023.9.7
这种方式其实就是通过类成员变量保存从构造方法传入的值,在重写的线程执行方法中就可以使用,具体传入其实不一定要使用构造方法,也可以自己定义一个方法用于传入参数。
class Main
{
    public static void main(String[] args)
    {
        Test t = new Test("Hello world");
        t.start();
        try
        {
            t.join();
        }
        catch (InterruptedException e)
        {
            e.printStackTrace();
        }
    }
}

class Test extends Thread
{
    private String str;

    public Test(String str)
    {
        this.str = str;
    }

    @Override
    public void run()
    {
        System.out.println(str);
    }
}
回调
2023.9.7
class Main
{
    public static void main(String[] args)
    {
        Test t = new Test(new ICallback()
        {
            @Override
            public void show(String str)
            {
                System.out.println(str);
            }
        }, "Hello world"); // 传入参数

        t.start();
        try
        {
            t.join();
        }
        catch (InterruptedException e)
        {
            e.printStackTrace();
        }
    }
}

interface ICallback
{
    void show(String str);
}

class Test extends Thread
{
    private ICallback callback;
    private String str;

    public Test(ICallback callback, String str)
    {
        this.callback = callback;
        this.str = str;
    }

    @Override
    public void run()
    {
        callback.show(this.str);
    }
}
同步
线程安全
2023.9.7
线程安全指多线程操作共享资源时出现数据或逻辑错误的问题。这里写了一个例子,线程类对一个静态变量自增一万次,然后实例了两个对象,两个对象内的静态变量实际是同一块内存地址,相当于两个线程执行的时候实际都是在操作同一个变量,按照预想的逻辑每个对象对这个变量自增一万次,两个对象执行结束后这个变量的值就应该是两万,然后实际值却是不确定的。
class Main
{
    public static void main(String[] args)
    {
        Test t1 = new Test();
        Test t2 = new Test();

        t1.start();
        t2.start();

        try
        {
            t1.join();
            t2.join();
        }
        catch (InterruptedException e)
        {
            e.printStackTrace();
        }

        System.out.println(Test.get());
    }
}

class Test extends Thread
{
    private static int count = 0;

    public static int get()
    {
        return count;
    }

    @Override
    public void run()
    {
        for (int i = 0; i < 10000; ++i)
        {
            ++count;
        }
    }
}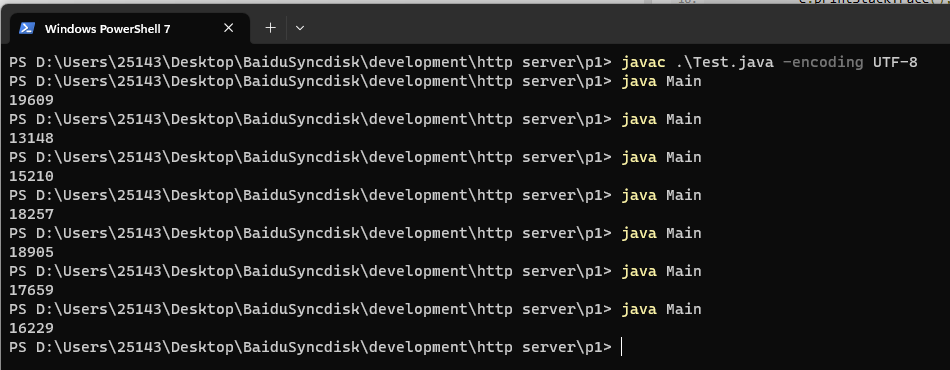
从运行结果看实际值都是小于两万的,这个情况其实很好理解。比如在某一个瞬间,两个线程同时执行自增,在自增前两个线程都拿到了相同的初始值,各自自增一次后再把值写回变量,结果两个线程做了完全一样的工作,两次自增在同一个值的基础上完成的,最后两个线程各自自增一万次的操作中难免出现多次同时执行,所以最终得到的结果不是两万。
synchronized 同步
2023.9.8
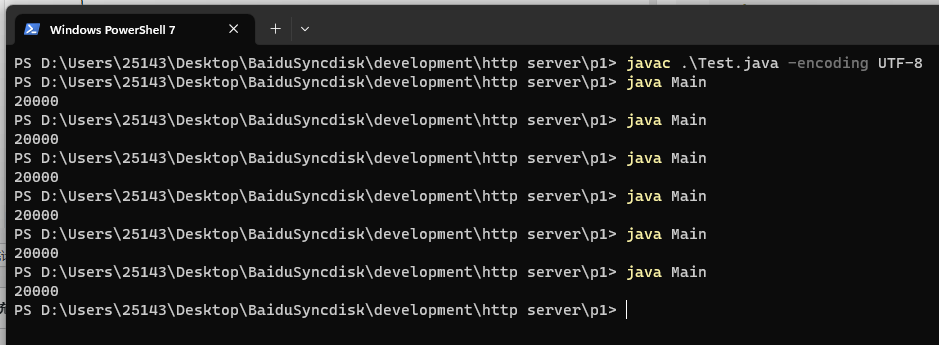
synchronized 可以保证同一时间只有一个线程使用共享资源,某个线程要尝试使用共享资源的时候,首先判断是否加锁了,没有加锁就加锁,然后使用,用完以后再解锁,同一时间其它线程准备使用时,会检测到有锁,那么就会跳过加锁部分的代码逻辑,这样就避免了同一时间多个线程对同一资源的使用。
class Main
{
    public static void main(String[] args)
    {
        Test t1 = new Test();
        Test t2 = new Test();

        t1.start();
        t2.start();

        try
        {
            t1.join();
            t2.join();
        }
        catch (InterruptedException e)
        {
            e.printStackTrace();
        }

        System.out.println(Test.get());
    }
}

class Test extends Thread
{
    private static int count = 0;

    public static int get()
    {
        return count;
    }

    @Override
    public void run()
    {
        synchronized(Test.class) // 每个线程锁定自己
        {
            for (int i = 0; i < 10000; ++i)
            {
                ++count;
            }
        }
    }
}
原子类型
2023.9.8
原子类型是一种可以在多线程环境下实现线程安全的数据类型,它们可以保证对变量的操作是原子的,即不可分割的,不会被其他线程干扰。原子类型的实现原理是利用了CPU提供的CAS(Compare And Swap)指令,这是一种无锁的算法,可以在不使用同步锁的情况下,实现对变量的更新。CAS指令需要三个参数:内存地址、旧值和新值。它会比较内存地址中的值是否等于旧值,如果相等,就用新值替换旧值,否则就放弃操作。这个过程是原子的,也就是说,在执行CAS指令期间,其他线程无法修改内存地址中的值。
import java.util.concurrent.atomic.AtomicInteger;

class Main
{
    public static void main(String[] args)
    {
        Test t1 = new Test();
        Test t2 = new Test();

        t1.start();
        t2.start();

        try
        {
            t1.join();
            t2.join();
        }
        catch (InterruptedException e)
        {
            e.printStackTrace();
        }

        System.out.println(Test.get());

    }
}

class Test extends Thread
{
    private static AtomicInteger count = new AtomicInteger(0); // 原子整形

    public static int get()
    {
        return count.get();
    }

    @Override
    public void run()
    {
        for (int i = 0; i < 10000; ++i)
        {
            count.incrementAndGet(); // 自增
        }
    }
}
文档注释
2023.9.8
在代码中按照一定的规则添加注释,可以使用工具将注释导出作为文档,也不需要单独去写文档,可以实现文档同步更新。我先大致看了一下,这注释标签和 Doxygen 挺像的,Doxygen 支持的语言比较多,像 Java、C、C++、Python 之类的都支持,也是从注释导出文档,比如 OpenCV 的文档就有采用 Doxygen
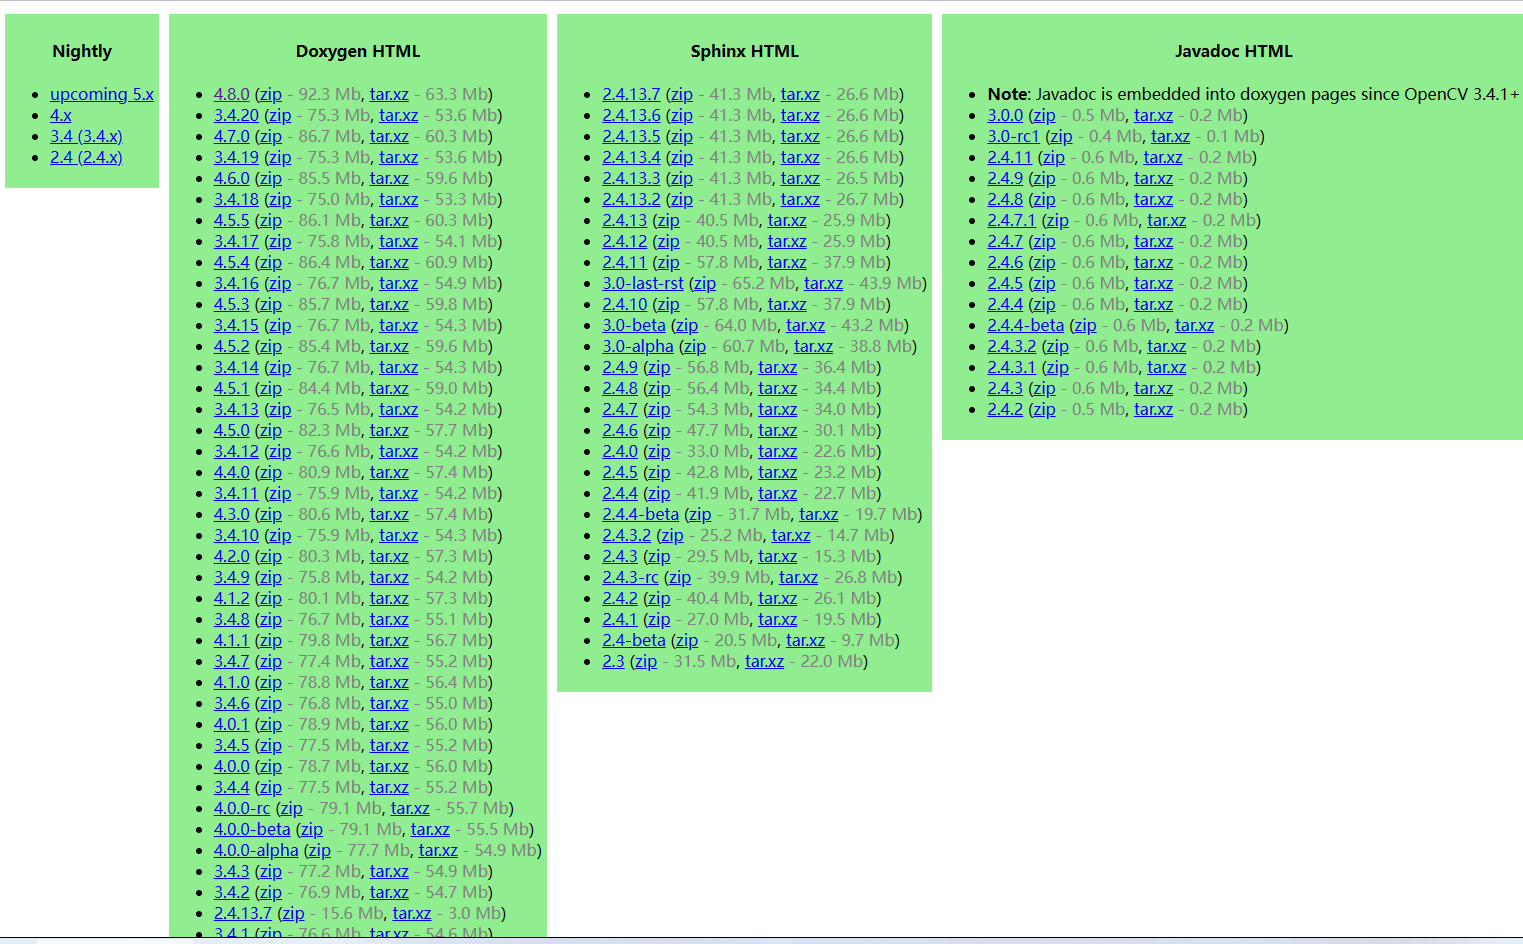
一看这种风格的页面就知道是 Doxygen 导出的
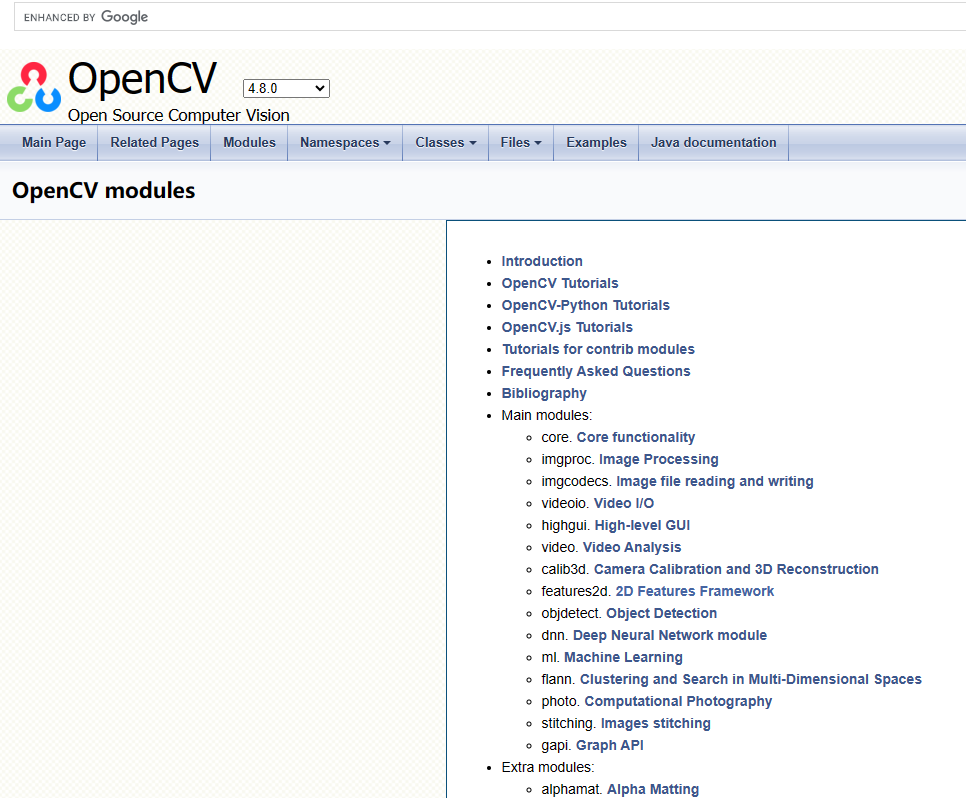
只是 JDK 里有配套的注释转文档工具,相当于 Java 自己做的工具,看了一下,Java 注释标签应该是没有 Doxygen 支持的多,不过是自带的,不需要额外配置,也是比较方便的。
javadoc 支持的注释标签:
| 标签 | 描述 |
|---|---|
| @author | 标识一个类的作者 |
| @deprecated | 指名一个过期的类或成员 |
| {@docRoot} | 指明当前文档根目录的路径 |
| @exception | 标志一个类抛出的异常 |
| {@inheritDoc} | 从直接父类继承的注释 |
| {@link} | 插入一个到另一个主题的链接 |
| {@linkplain} | 插入一个到另一个主题的链接,但是该链接显示纯文本字体 |
| @param | 说明一个方法的参数 |
| @return | 说明返回值类型 |
| @see | 指定一个到另一个主题的链接 |
| @serial | 说明一个序列化属性 |
| @serialData | 说明通过writeObject()和writeExternal()方法写的数据 |
| @serialField | 说明一个ObjectStreamField组件 |
| @since | 标记当引入一个特定的变化时 |
| @throws | 和@exception标签一样 |
| {@value} | 显示常量的值,该常量必须是static属性 |
| @version | 指定类的版本 |
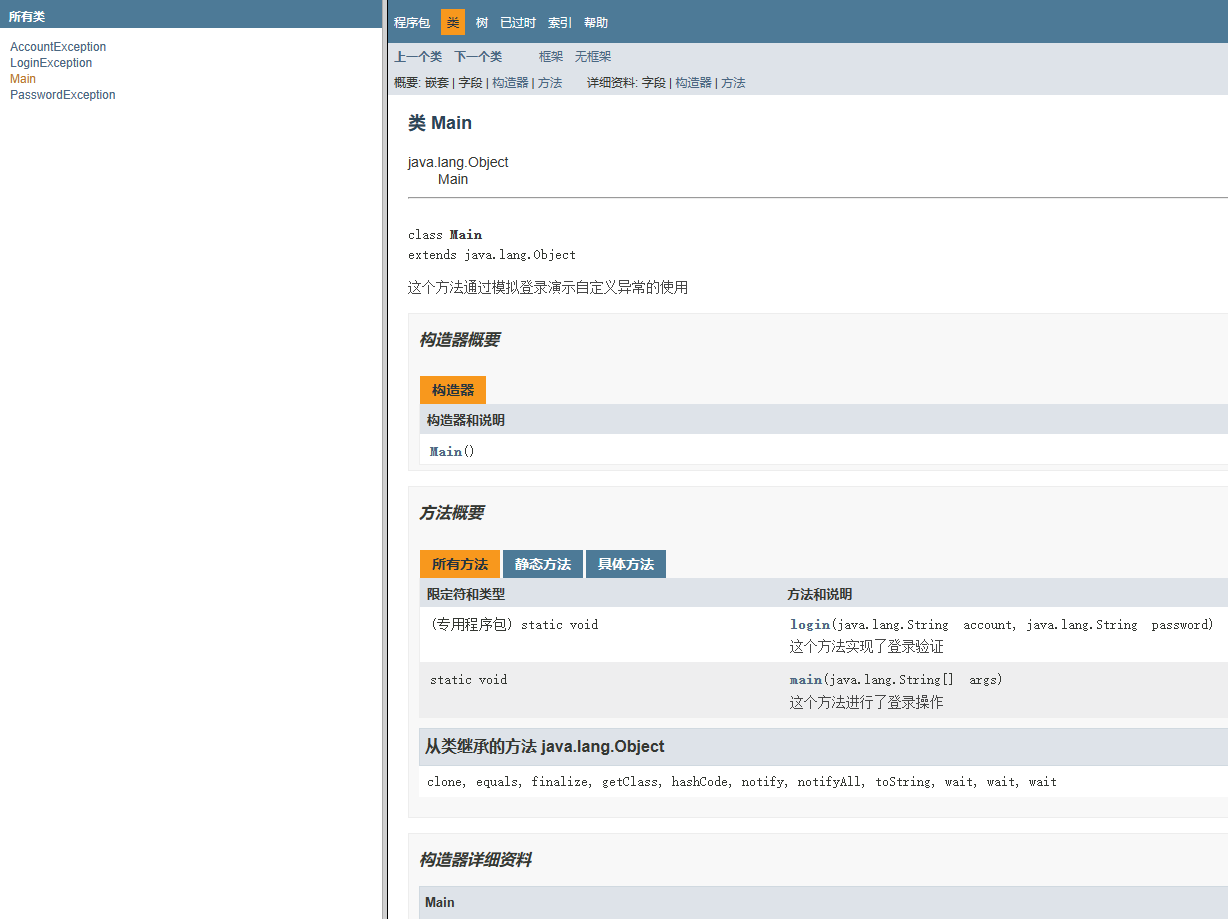
选用的前面写的代码用作注释示例:
/**
 * 这个方法通过模拟登录演示自定义异常的使用
 * @author IYATT-yx
 * @version 1.0
 */
class Main
{
    /**
     * 这个方法进行了登录操作
     * @param args 未使用的参数
     */
    public static void main(String[] args)
    {
        String account = "admin";
        String password = "passw";

        try
        {
            login(account, password);
        }
        catch (AccountException e)
        {
            e.printStackTrace();
            System.out.println("请重新输入账号!");
        }
        catch (PasswordException e)
        {
            e.printStackTrace();;
            System.out.println("请重新输入密码!");
        }
    }

    /**
     * 这个方法实现了登录验证
     * @param account 待验证的账号
     * @param password 待验证的密码
     * @throws AccountException 账号错误
     * @throws PasswordException 密码错误
     */
    static void login(String account, String password) throws AccountException, PasswordException // 声明该方法可能抛出的异常(告知调用者)
    {
        if (!"admin".equals(account))
        {
            throw new AccountException("账号不正确!");
        }
        if (!"passwd".equals(password))
        {
            throw new PasswordException("密码不正确!");
        }
        System.out.println("登录成功");
    }
}

/**
 * 登录异常
 */
class LoginException extends RuntimeException
{
    /**
     * 这个方法抛出登录异常消息
     * @param message 消息内容
     */
    public LoginException(String message)
    {
        super(message);
    }
}

/**
 * 账号异常
 */
class AccountException extends LoginException
{
    /**
     * 这个方法抛出账号异常消息
     * @param messgae 消息内容
     */
    public AccountException(String messgae)
    {
        super(messgae);
    }
}

/**
 * 密码异常
 */
class PasswordException extends LoginException
{
    /**
     * 这个方法抛出密码异常消息
     * @param message 消息内容
     */
    public PasswordException(String message)
    {
        super(message);
    }
}
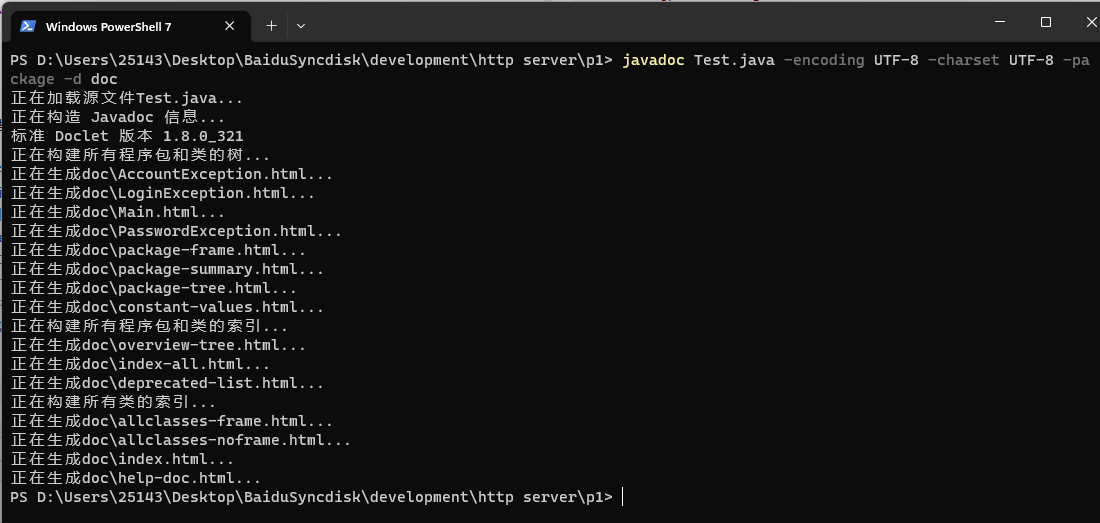
javadoc 的一些参数说明:
- 指定源文件字符集编码,比如 -encoding UTF-8
- 指定生成文档的字符集编码,比如 -charset UTF-8
- 生成文档范围:-public 仅显示 public 类和成员,这是最严格的选项,只生成公开的 API 文档;-protected 显示 protected/public 类和成员,这是默认的选项,生成包含受保护的类和成员的 API 文档;-package 显示 package/protected/public/default 类和成员,这个选项会生成包含包级别的类和成员的API文档;-private 显示所有类和成员,这是最宽松的选项,生成包含私有的类和成员的 API 文档。
- 指定文档生成路径使用:-d <路径>,否则默认生成到当前路径
下面是示例

打包 jar
2023.9.8
简单写了一段代码演示
class Main
{
    public static void main(String[] args)
    {
        Test t = new Test();
        t.show();
    }
}

class Test
{
    public void show()
    {
        System.out.println("hello world");
    }
}
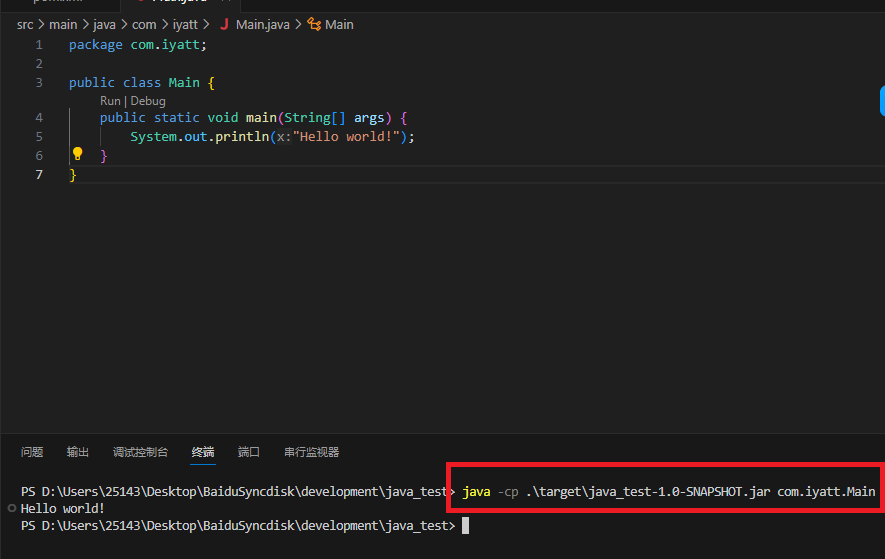
打包生成 jar 文件实际是将编译好的字节码文件压缩而成的,并不是特定平台的可执行文件,依然有跨平台的特性。

如果打包的时候没有指定主类,也可以在运行的时候指定类名全称作为主类运行
package – 包
2023.9.8
项目结构
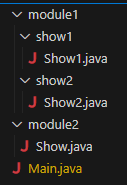
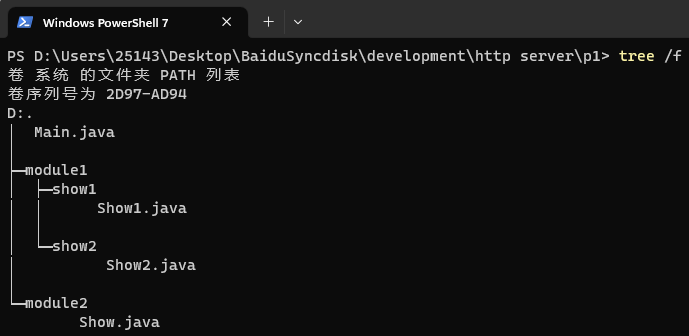
Show1.java
package module1.show1;

public class Show1
{
    public Show1()
    {
        System.out.println("module1.show1.Show1");
    }
}
Show2.java
package module1.show2;

public class Show2
{
    public Show2()
    {
        System.out.println("module1.show2.Show2");
    }
}
Show.java
package module2;

public class Show
{
    public Show()
    {
        System.out.println("module2.Show");
    }
}
Main.java
import module1.show1.Show1;
import module1.show2.Show2;
import module2.Show;

public class Main
{
    public static void main(String[] args)
    {
        Show1 s1 = new Show1();
        Show2 s2 = new Show2();
        Show s = new Show();
    }
}
Maven 基础
2023.9.9
大概了解了一下 Maven,感觉它的概念像包管理器,类似于 Python 的 pip,Linux 的 apt/yum/…,Windows 的 winget。在此基础上还具有类似 CMake、git 的部分作用,综合了很多特性。
下载安装
下载地址:https://maven.apache.org/download.cgi
配置好环境变量就能正常使用了(Java 和 Maven 的实际路径)
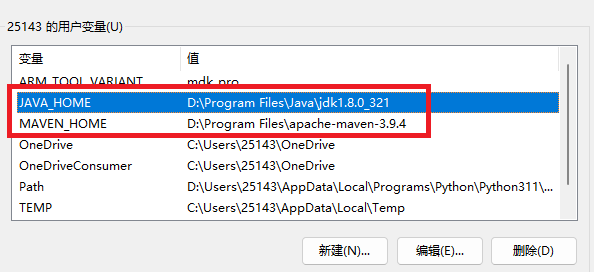
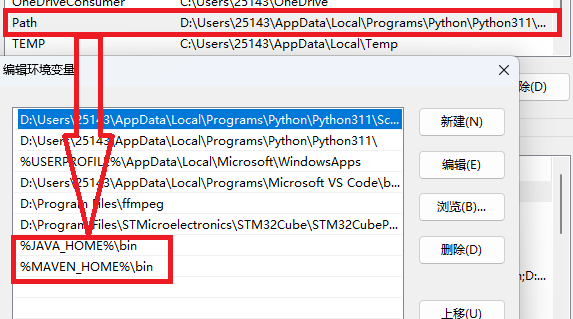

本地仓库路径
Maven 默认本地仓库路径配置,在%MAVEN_HOME%\conf\settings.xml中
如果没有修改默认是在 %USERPROFILE%\.m2
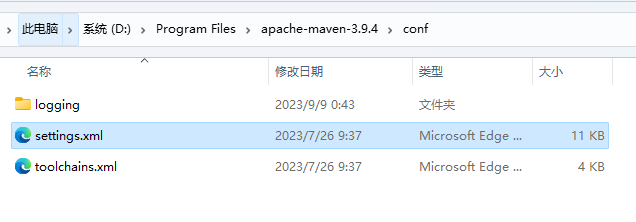

配置自定义路径
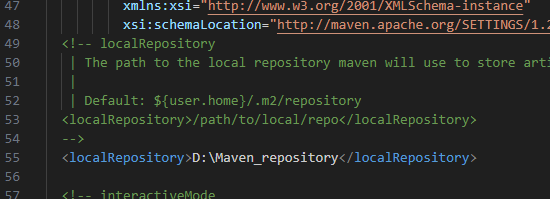
远程仓库配置国内镜像
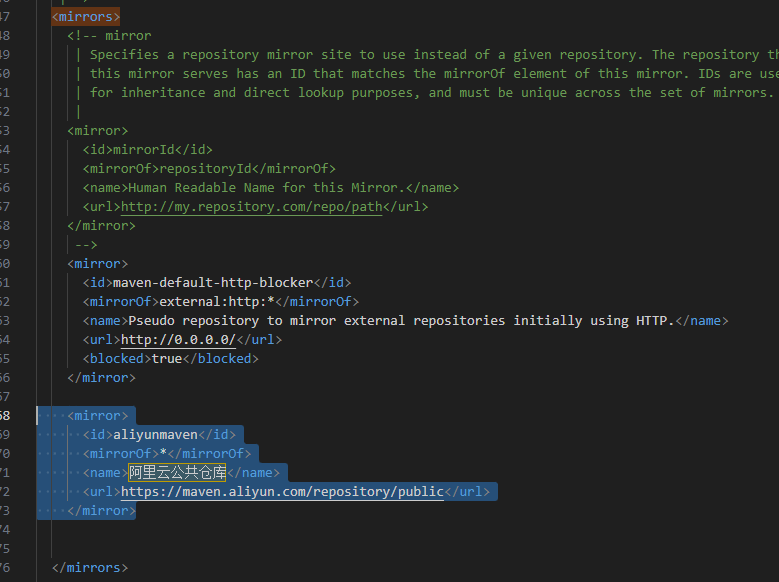
Maven 的官方远程仓库在国外,一般这种情况下载速度都可能比较慢,所以会换成国内的镜像。
打开配置文件%MAVEN_HOME%\conf\settings.xml
找到
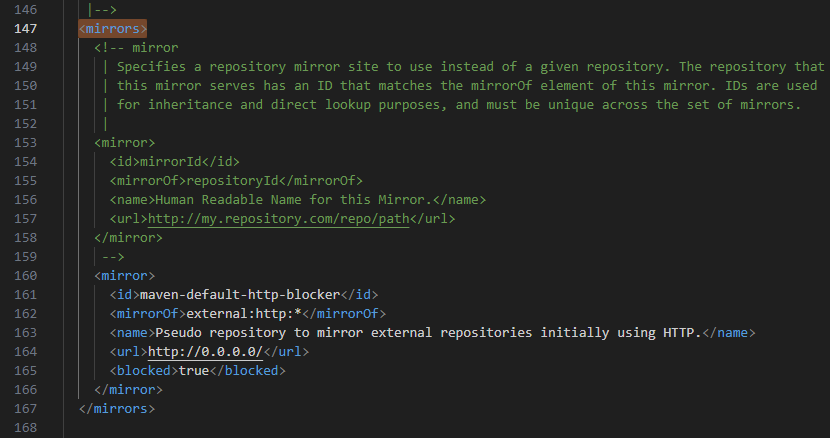
比如我这里使用阿里云镜像
查看当前生效的配置
mvn help:effective-settings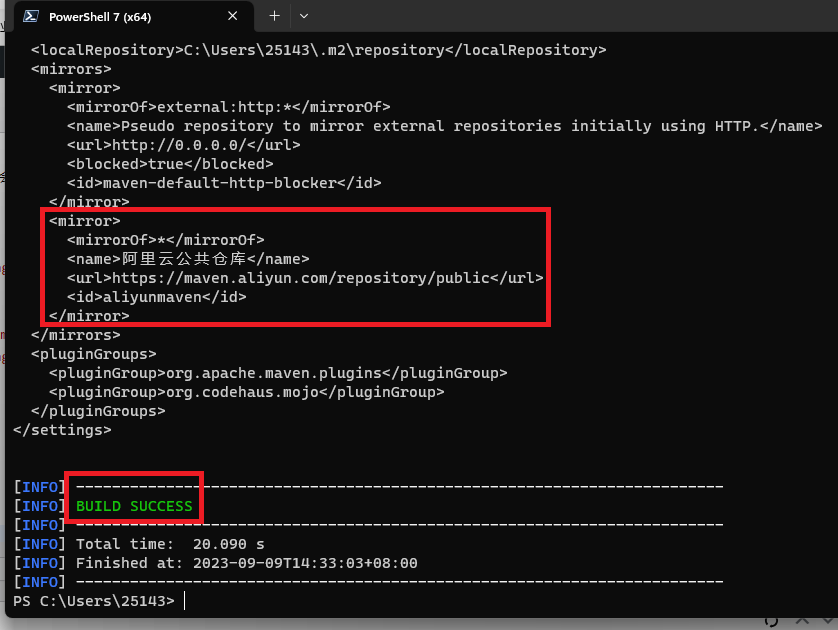
官方远程仓库:https://mvnrepository.com/
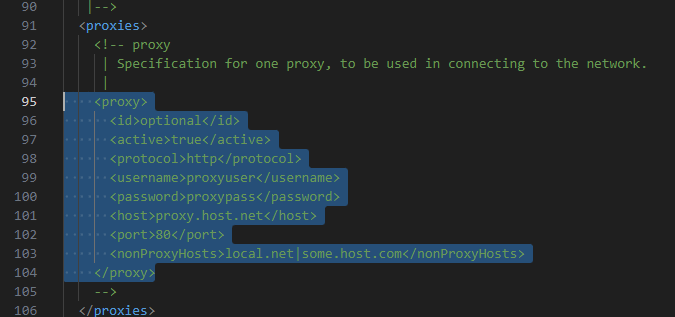
或者可以不使用镜像,直接配置代理加速访问
项目结构
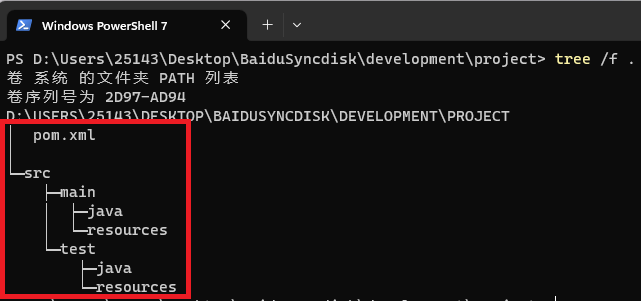
main 就是放主程序,test 放测试程序(不是必须),java 放包或代码文件,resources 放程序要使用的配置文件,pom.xml 就是项目的配置文件,包含组织名、项目名称、版本、依赖等等。
可以使用命令生成
mvn archetype:generate选择模板
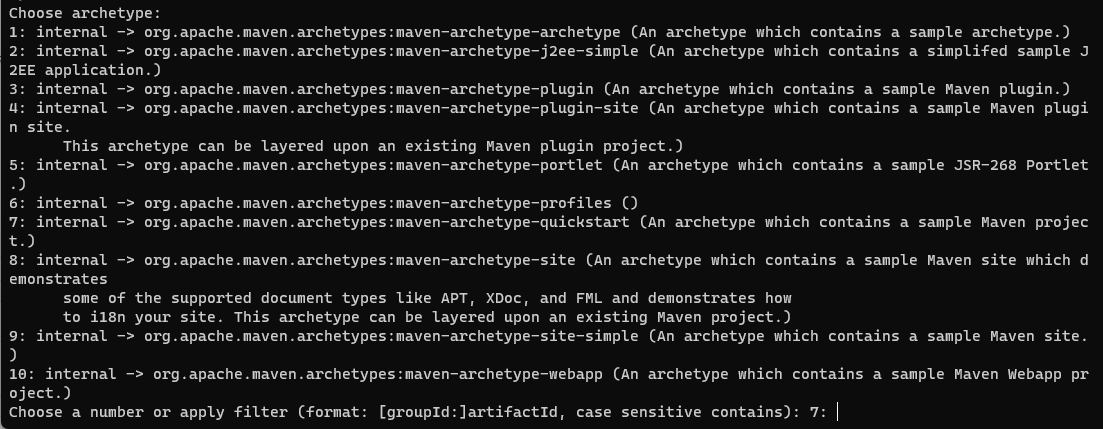
- maven-archetype-archetype:这是一个包含了一个示例Archetype项目的Archetype,可以用来创建自定义的Archetype2。
- maven-archetype-j2ee-simple:这是一个包含了一个简化的J2EE应用的Archetype,可以用来创建基于Java EE规范的Web应用3。
- maven-archetype-plugin:这是一个包含了一个示例Maven插件的Archetype,可以用来创建自定义的Maven插件。
- maven-archetype-plugin-site:这是一个包含了一个示例Maven插件站点的Archetype,可以用来为已有的Maven插件创建文档和报告。
- maven-archetype-portlet:这是一个包含了一个示例JSR-268 Portlet的Archetype,可以用来创建基于Portlet规范的Web组件。
- maven-archetype-profiles:这是一个包含了多个配置文件的Archetype,可以用来根据不同的环境或需求选择不同的构建设置。
- maven-archetype-quickstart:这是一个包含了一个示例Maven项目的Archetype,可以用来快速开始一个Java项目。
- maven-archetype-site:这是一个包含了一个示例Maven站点的Archetype,可以用来展示一些支持的文档类型,如APT, XDoc, 和 FML,并且演示如何实现站点的国际化。这个Archetype可以用来为已有的Maven项目创建站点。
- maven-archetype-site-simple:这是一个包含了一个简单的Maven站点的Archetype,可以用来为Maven项目创建基本的站点。
- maven-archetype-webapp:这是一个包含了一个示例Maven Webapp项目的Archetype,可以用来创建基于Servlet和JSP技术的Web应用。
这里演示就直接回车,默认选的 7 maven-archetype-quickstart
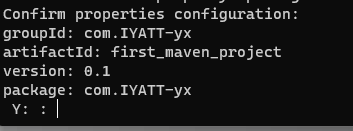
公司/组织名
比如:abcd 组织可以写org.abcd,abcd 公司可以写com.abcd

项目名

版本

项目包名,默认使用项目名(注意包只能含有字母(建议不使用大写,避免和类名混淆)、数字、英文句点和下划线,这里演示就维持的默认)

回车确认
生成项目

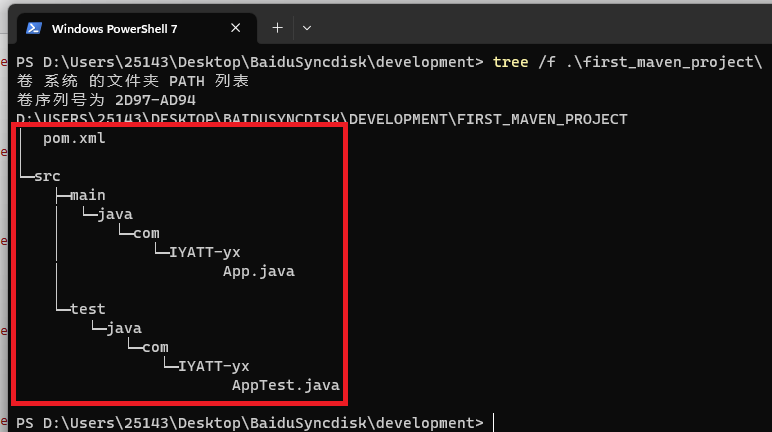
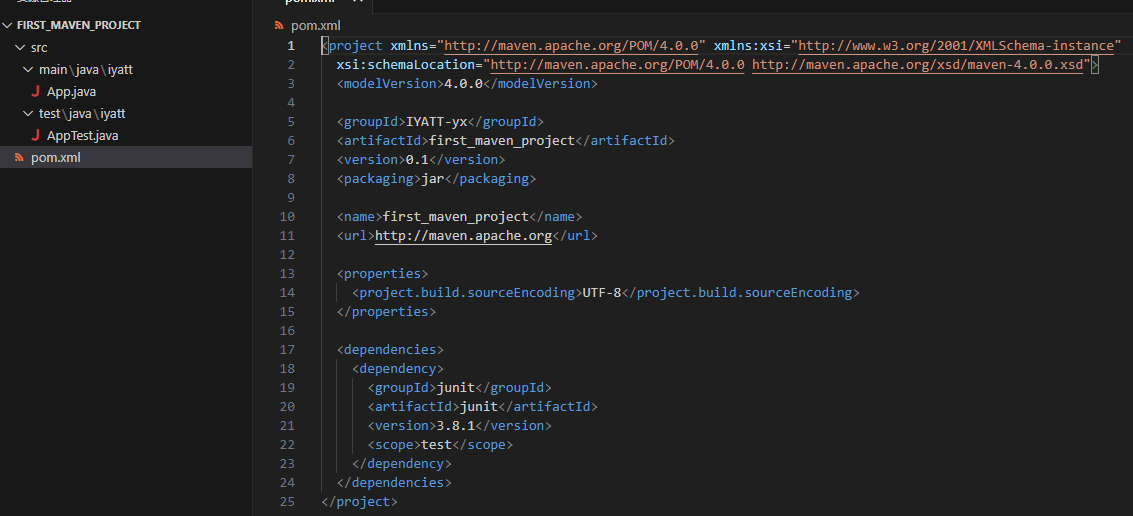
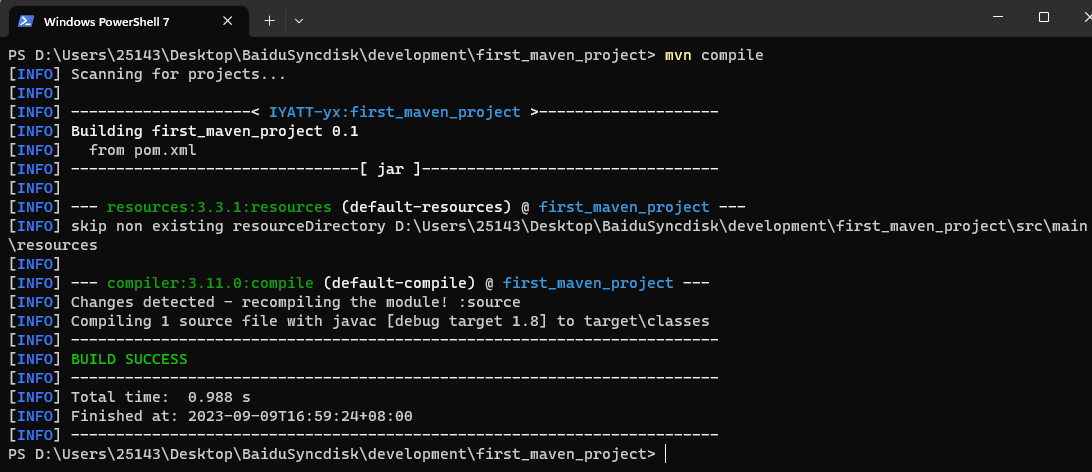
编译创建的模板(进入项目目录之后,即在 pom.xml 文件所在路径执行下面操作)
mvn compile可以使用参数-Dmaven.test.skip=true跳过测试程序编译
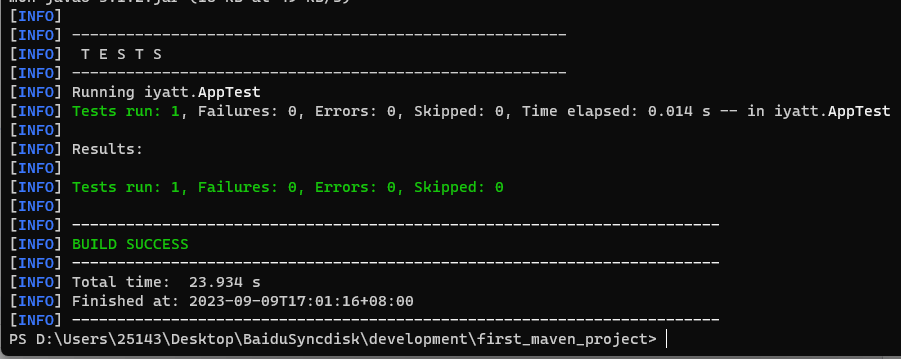
测试
mvn test可以使用参数-Dtest=<类名>运行指定的测试类
项目目录下会生成测试报告
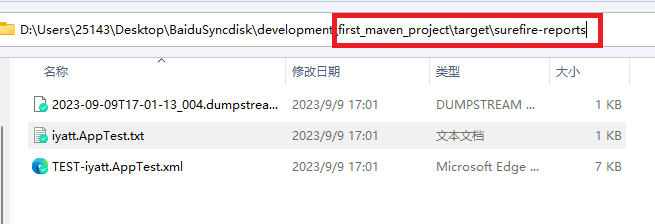
打包
mvn package使用-DoutputDirectory=<路径>指定生成文件所在目录,默认为 target 目录

项目清理(删除项目目录下生成的相关文件,即删除 target 目录)
mvn clean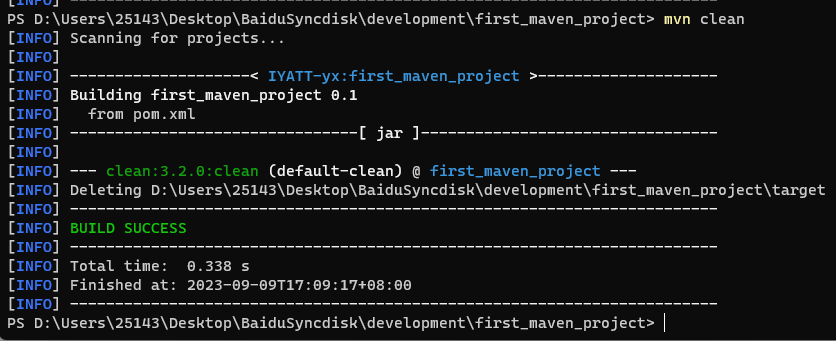
实际使用中敲命令挺麻烦的,我这里是使用 VScode+插件,安装 Java 扩展插件的时候就会连带一起共安装 6 个,里面就有 Maven 插件

操作都可以通过图形化点击完成
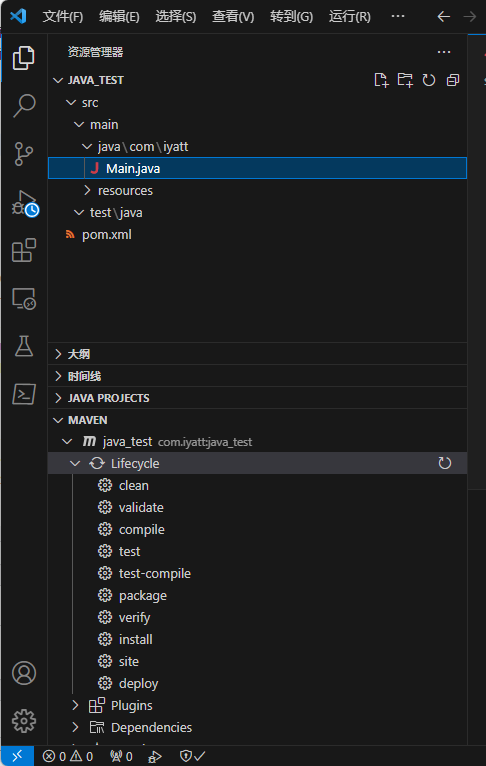
一个基础的 pom.xml 模板
<?xml version="1.0" encoding="UTF-8"?>
<project xmlns="http://maven.apache.org/POM/4.0.0"
         xmlns:xsi="http://www.w3.org/2001/XMLSchema-instance"
         xsi:schemaLocation="http://maven.apache.org/POM/4.0.0 http://maven.apache.org/xsd/maven-4.0.0.xsd">
    <modelVersion>4.0.0</modelVersion>

    <groupId>com.iyatt</groupId>
    <artifactId>java_test</artifactId>
    <version>1.0-SNAPSHOT</version>

    <properties>
        <maven.compiler.source>1.8</maven.compiler.source>
        <maven.compiler.target>1.8</maven.compiler.target>
        <project.build.sourceEncoding>UTF-8</project.build.sourceEncoding>
        <project.reporting.outputEncoding>UTF-8</project.reporting.outputEncoding>
    </properties>

</project>
编译并执行
2023.9.13
这里可以借助 exec-maven-plugin 插件,下面写了一个示例
package com.iyatt;

public class Main
{
    public static void main(String[] args)
    {
        System.out.println("Hello world!");
        for (String arg : args) // 如果有传入参数就依次打印
        {
            System.out.println(arg);
        }
    }
}
可以把要传入的参数配置在 pom.xml 中,那么执行的时候就不用输入参数
pox.xml
<?xml version="1.0" encoding="UTF-8"?>
<project xmlns="http://maven.apache.org/POM/4.0.0"
         xmlns:xsi="http://www.w3.org/2001/XMLSchema-instance"
         xsi:schemaLocation="http://maven.apache.org/POM/4.0.0 http://maven.apache.org/xsd/maven-4.0.0.xsd">
    <modelVersion>4.0.0</modelVersion>

    <groupId>com.iyatt</groupId>
    <artifactId>test</artifactId>
    <version>1.0-SNAPSHOT</version>

    <properties>
        <maven.compiler.source>1.8</maven.compiler.source>
        <maven.compiler.target>1.8</maven.compiler.target>
        <project.build.sourceEncoding>UTF-8</project.build.sourceEncoding>
        <project.reporting.outputEncoding>UTF-8</project.reporting.outputEncoding>
    </properties>

    <build>
        <plugins>
            <plugin>
            <groupId>org.codehaus.mojo</groupId>
            <artifactId>exec-maven-plugin</artifactId>
            <version>3.1.0</version>
            <configuration>
                <mainClass>com.iyatt.Main</mainClass>
                <arguments>
                <argument>第一个参数</argument>
                <argument>第二个参数</argument>
                </arguments>
            </configuration>
            </plugin>
        </plugins>
    </build>

</project>
编译执行
mvn compile exec:java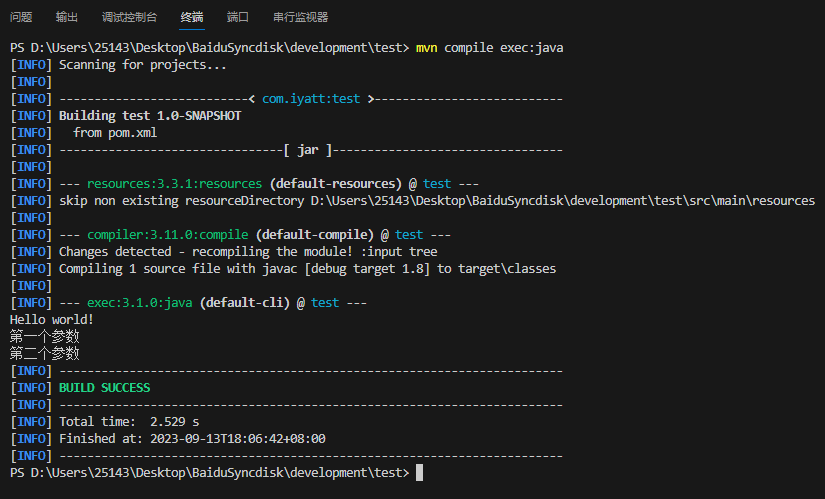
如果 pom.xml 没有配置主类以及参数,也可以手动指定
pom.xml
<?xml version="1.0" encoding="UTF-8"?>
<project xmlns="http://maven.apache.org/POM/4.0.0"
         xmlns:xsi="http://www.w3.org/2001/XMLSchema-instance"
         xsi:schemaLocation="http://maven.apache.org/POM/4.0.0 http://maven.apache.org/xsd/maven-4.0.0.xsd">
    <modelVersion>4.0.0</modelVersion>

    <groupId>com.iyatt</groupId>
    <artifactId>test</artifactId>
    <version>1.0-SNAPSHOT</version>

    <properties>
        <maven.compiler.source>1.8</maven.compiler.source>
        <maven.compiler.target>1.8</maven.compiler.target>
        <project.build.sourceEncoding>UTF-8</project.build.sourceEncoding>
        <project.reporting.outputEncoding>UTF-8</project.reporting.outputEncoding>
    </properties>

    <build>
        <plugins>
            <plugin>
            <groupId>org.codehaus.mojo</groupId>
            <artifactId>exec-maven-plugin</artifactId>
            <version>3.1.0</version>
            </plugin>
        </plugins>
    </build>

</project>
编译执行
mvn compile exec:java -D"exec.mainClass"="com.iyatt.Main" -D"exec.args"="第一个参数 第二个参数"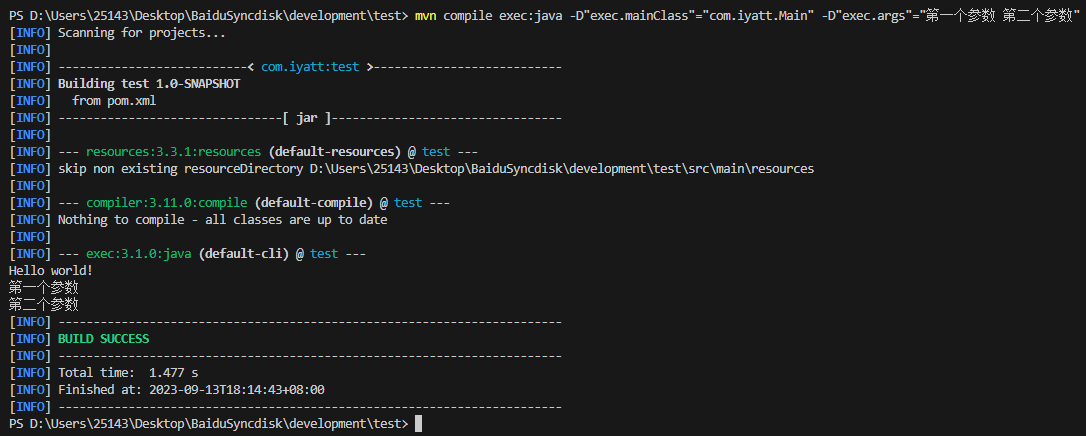
多个主类
2023.9.13
注意如果使用 Maven 执行,主类必须是 public,而一个 Java 文件中只能有一个 public 类,所以主类必须在不同文件,这里写一个示例:
Main1.java
package com.iyatt;

public class Main1
{
    public static void main(String[] args)
    {
        System.out.println("Hello world!");
        for (String arg : args) // 如果有传入参数就依次打印
        {
            System.out.println(arg);
        }
    }
}
Main2.java
package com.iyatt;

public class Main2
{
    public static void main(String[] args)
    {
        System.out.println("你好 世界!");
        for (String arg : args) // 如果有传入参数就依次打印
        {
            System.out.println(arg);
        }
    }
}
pom.xml 配置的时候可以给每个主类设置一个 id,运行的时候用 -P
<?xml version="1.0" encoding="UTF-8"?>
<project xmlns="http://maven.apache.org/POM/4.0.0"
         xmlns:xsi="http://www.w3.org/2001/XMLSchema-instance"
         xsi:schemaLocation="http://maven.apache.org/POM/4.0.0 http://maven.apache.org/xsd/maven-4.0.0.xsd">
    <modelVersion>4.0.0</modelVersion>

    <groupId>com.iyatt</groupId>
    <artifactId>test</artifactId>
    <version>1.0-SNAPSHOT</version>

    <properties>
        <maven.compiler.source>1.8</maven.compiler.source>
        <maven.compiler.target>1.8</maven.compiler.target>
        <project.build.sourceEncoding>UTF-8</project.build.sourceEncoding>
        <project.reporting.outputEncoding>UTF-8</project.reporting.outputEncoding>
    </properties>

    <profiles>
        <profile>
            <id>main1</id>
            <build>
                <plugins>
                    <plugin>
                        <groupId>org.codehaus.mojo</groupId>
                        <artifactId>exec-maven-plugin</artifactId>
                        <version>3.1.0</version>
                        <configuration>
                            <mainClass>com.iyatt.Main1</mainClass>
                            <arguments>
                                <argument>第一个参数</argument>
                                <argument>第二个参数</argument>
                            </arguments>
                        </configuration>
                    </plugin>
                </plugins>
            </build>
        </profile>

        <profile>
            <id>main2</id>
            <build>
                <plugins>
                    <plugin>
                        <groupId>org.codehaus.mojo</groupId>
                        <artifactId>exec-maven-plugin</artifactId>
                        <version>3.1.0</version>
                        <configuration>
                            <mainClass>com.iyatt.Main2</mainClass>
                            <arguments>
                                <argument>第三个参数</argument>
                                <argument>第四个参数</argument>
                            </arguments>
                        </configuration>
                    </plugin>
                </plugins>
            </build>
        </profile>
    </profiles>

</project>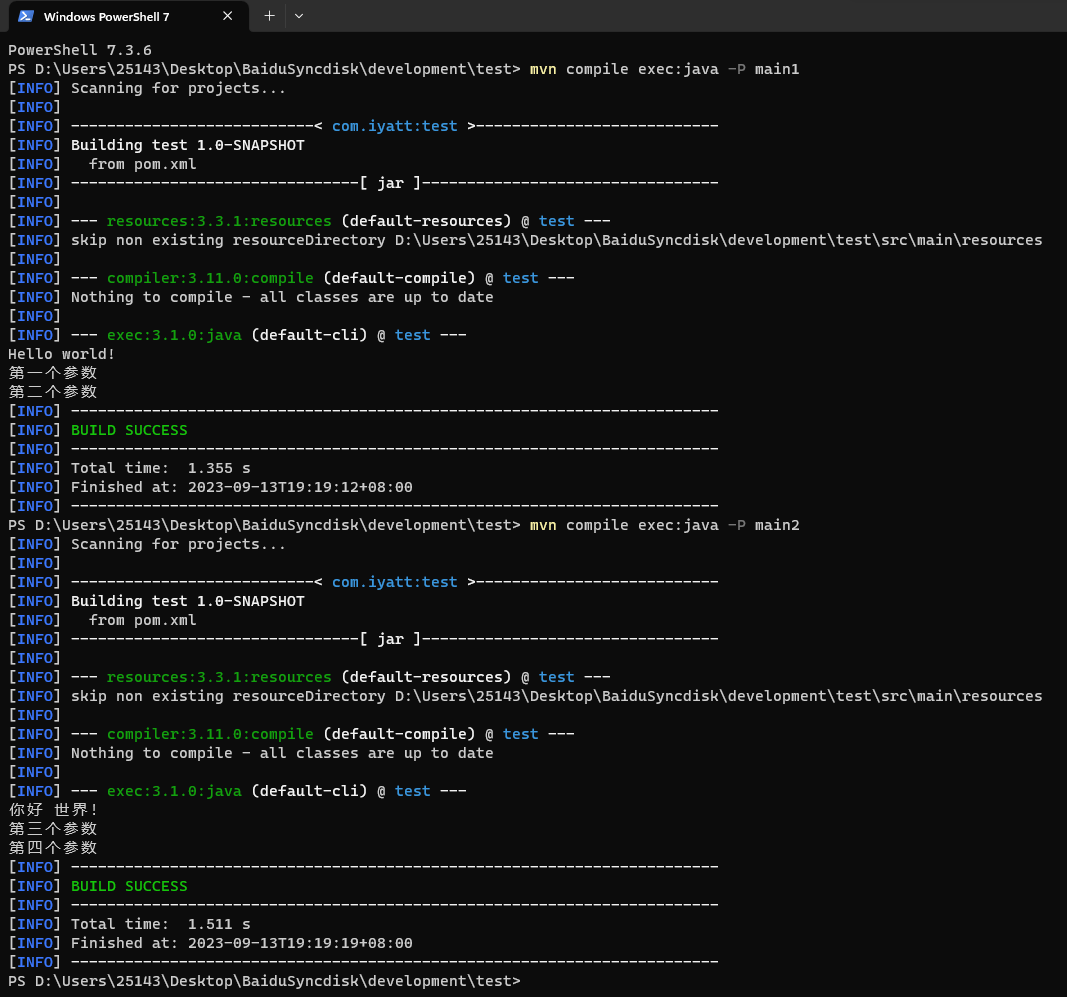
JSON 解析 – Gson
2023.9.9
Gson 是 Google 开发的 JSON 库,功能最为强大完善。
这里使用 Maven 配置项目
pom.xml
<?xml version="1.0" encoding="UTF-8"?>
<project xmlns="http://maven.apache.org/POM/4.0.0"
         xmlns:xsi="http://www.w3.org/2001/XMLSchema-instance"
         xsi:schemaLocation="http://maven.apache.org/POM/4.0.0 http://maven.apache.org/xsd/maven-4.0.0.xsd">
    <modelVersion>4.0.0</modelVersion>

    <groupId>com.iyatt</groupId>
    <artifactId>java_test</artifactId>
    <version>1.0-SNAPSHOT</version>

    <properties>
        <maven.compiler.source>1.8</maven.compiler.source>
        <maven.compiler.target>1.8</maven.compiler.target>
        <project.build.sourceEncoding>UTF-8</project.build.sourceEncoding>
        <project.reporting.outputEncoding>UTF-8</project.reporting.outputEncoding>
    </properties>

    <dependencies>
        <dependency>
            <groupId>com.google.code.gson</groupId>
            <artifactId>gson</artifactId>
            <version>2.10.1</version>
        </dependency>
    </dependencies>

</project>
项目结构
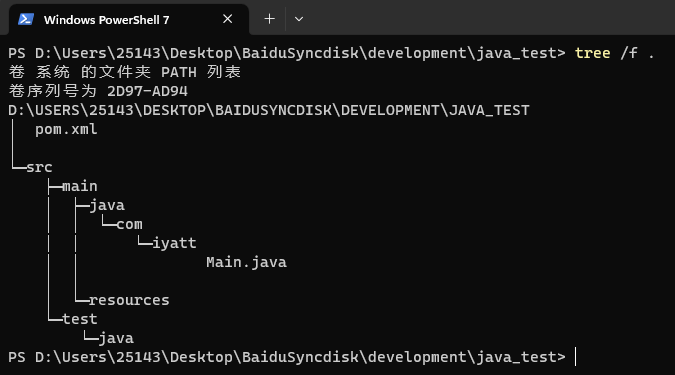
学习参考的官方文档:https://github.com/google/gson/blob/main/UserGuide.md
基本示例
2023.9.12
序列化:将 Java 对象转为 JSON 字符串
反序列化:将 JSON 字符串转为 Java 对象
package com.iyatt;
import com.google.gson.Gson;

public class Main
{
    public static void main(String[] args)
    {
        // 序列化
        Gson gson = new Gson();
        String s1 = gson.toJson(1);
        String s2 = gson.toJson("abcd");
        String s3 = gson.toJson(new Long(10));
        int[] values = {1, 2, 3};
        String s4 = gson.toJson(values);
        System.out.println(s1);
        System.out.println(s2);
        System.out.println(s3);
        System.out.println(s4);

        // 反序列化
        int i = gson.fromJson("1", int.class);
        Integer int_obj = gson.fromJson("1", Integer.class);
        Boolean bool_obj = gson.fromJson("true", Boolean.class);
        String str = gson.fromJson(""abc"", String.class);
        String[] str_array = gson.fromJson("["123", "abc"]", String[].class);
        for (String s : str_array)
        {
            System.out.println(s);
        }
    }
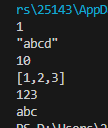
}
对象示例
2023.9.12
package com.iyatt;
import com.google.gson.Gson;

class BagOfPrimitives
{
    private String name = "小明";
    private int age = 20;
    private transient int value = 100; // transient 修饰在序列化时会忽略
}

public class Main
{
    public static void main(String[] args)
    {
        BagOfPrimitives bop = new BagOfPrimitives();
        Gson gson = new Gson();
        String json = gson.toJson(bop);
        System.out.println(json);
    }
}
数组示例
package com.iyatt;
import com.google.gson.Gson;

public class Main
{
    public static void main(String[] args)
    {
        int[] nums = {1, 2, 3, 4, 5};
        String[] strs = {"abcd", "1234"};

        Gson gson = new Gson();
        System.out.println(gson.toJson(nums));
        System.out.println(gson.toJson(strs));

        String s = "[1, 2, 3, 4]";
        int[] num_array = gson.fromJson(s, int[].class);
        for (int i : num_array)
        {
            System.out.print(i + " ");
        }
    }
}
集合示例
2023.9.12
package com.iyatt;
import java.util.Arrays;
import java.util.Collection;
import com.google.gson.Gson;
import com.google.gson.reflect.TypeToken;

public class Main
{
    public static void main(String[] args)
    {
        Gson gson = new Gson();

        // 序列化
        Collection<Integer> ints = Arrays.asList(1, 2, 3, 4, 5);
        String json = gson.toJson(ints);
        System.out.println(json);

        // 反序列化
        TypeToken<Collection<Integer>> collection_type = new TypeToken<Collection<Integer>>(){};
        Collection<Integer> ints2 = gson.fromJson(json, collection_type);
        for (Integer i : ints2)
        {
            System.out.print(i + " ");
        }
    }
}
Map 示例
2023.9.12
package com.iyatt;
import java.util.LinkedHashMap;
import java.util.Map;
import com.google.gson.Gson;
import com.google.gson.reflect.TypeToken;

public class Main
{
    public static void main(String[] args)
    {
        Gson gson = new Gson();
        Map<String, String> string_map = new LinkedHashMap<>();
        string_map.put("键", "值");
        string_map.put(null, "空");

        // 序列化
        String json = gson.toJson(string_map);
        System.out.println(json);

        // 反序列化
        TypeToken<Map<String, String>> map_type = new TypeToken<Map<String, String>>(){};
        Map<String, String> string_map2 = gson.fromJson(json, map_type);
        string_map2.forEach((k, v) -> System.out.println(k + " : " + v));
    }
}
较复杂的键
2023.9.12
这里使用一个类对象作为键来示例
package com.iyatt;
import java.util.LinkedHashMap;
import java.util.Map;
import com.google.gson.Gson;
import com.google.gson.GsonBuilder;

class PersonName
{
    private String first_name;
    private String last_name;

    public PersonName(String first_name, String las_name)
    {
        this.first_name = first_name;
        this.last_name = las_name;
    }
}

public class Main
{
    public static void main(String[] args)
    {
        Gson gson = new GsonBuilder().enableComplexMapKeySerialization().create();
        Map<PersonName, Integer> complex_map = new LinkedHashMap<>();
        complex_map.put(new PersonName("Hong", "Zhang"), 20);
        complex_map.put(new PersonName("Ming", "Li"), 21);
        String json = gson.toJson(complex_map);
        System.out.println(json);
    }
}
泛型
2023.9.12
package com.iyatt;
import com.google.gson.Gson;
import com.google.gson.reflect.TypeToken;
import java.lang.reflect.Type;

class Test<T>
{
    T value;
}

public class Main
{
    public static void main(String[] args)
    {
        Gson gson = new Gson();

        Test<String> t = new Test<>();
        t.value = "你好";
        String json = gson.toJson(t, t.getClass()); // 序列化
        System.out.println(json);

        Test<Integer> i = new Test<>();
        i.value = 10;
        json = gson.toJson(i); // 序列化
        System.out.println(json);

        Test<Integer> i2 = new Test<>();
        Type i_type = new TypeToken<Test<Integer>>(){}.getType(); // 获取类型
        i2 = gson.fromJson(json, i_type); // 反序列化
        System.out.println(i2.value);
    }
}
对象存储与创建
2023.9.20
我接的那个项目里最开始用的 Java 的对象存储,后面又换成了用 xml 来备份和恢复内容服务器发送过来的内容,使用的 DOM4J 库,后面想着本来就要用 Gson 库,为什么不都用 Gson 库,于是又研究了一下应该怎么存储项目里类似 HashMap<String, Request> 结构的对象,其中 Request 是自定义的类,这里就先探索试了一下,发现简单不少,Gson 的序列化和反序列化封装得很完善。我用 DOM4J 实现的存储恢复是手动匹配类的每个属性的,相当于是定制的,不能存储其它类型,试了一下 Gson 之后才意识到可以使用反射来实现,这样就可以做到通用,不过已经计划换成 Gson 来储存恢复了,暂时也就不探索 DOM4J 方案的泛型对象存储实现了。
package com.iyatt;

import java.io.FileInputStream;
import java.io.FileOutputStream;
import java.io.InputStreamReader;
import java.util.HashMap;
import java.util.Map;
import java.io.OutputStreamWriter;

import com.google.gson.Gson;
import com.google.gson.GsonBuilder;
import com.google.gson.reflect.TypeToken;

class Person
{
    private String name;
    private int age;

    public Person()
    {

    }

    public Person(String name, int age)
    {
        this.name = name;
        this.age = age;
    }

    public String toString()
    {
        return "Person [name=" + this.name + ", age=" + this.age + "]";
    }
}

class JsonUtil
{
    public static void saveToJsonFile(HashMap<String, Person> map, String file_name) throws Exception
    {
        // Gson gson = new Gson(); // 一行 Json
        Gson gson = new GsonBuilder().setPrettyPrinting().create(); // 自动换行的 Json
        try (OutputStreamWriter writer = new OutputStreamWriter(new FileOutputStream(file_name), "UTF-8"))
        {
            gson.toJson(map, writer);
        }
    }

    public static HashMap<String, Person> loadFromJsonFile(String file_name) throws Exception
    {
        Gson gson = new Gson();
        try (InputStreamReader reader = new InputStreamReader(new FileInputStream(file_name), "UTF-8"))
        {
            return gson.fromJson(reader, new TypeToken<HashMap<String, Person>>(){}.getType());
        }
    }
}

class Main
{
    public static void main(String[] args) throws Exception
    {
        Person p1 = new Person("李明", 20);
        Person p2 = new Person("陈强", 23);
        Person p3 = new Person("谭力", 21);

        HashMap<String, Person> map1 = new HashMap<>();
        map1.put("第一个", p1);
        map1.put("第二个", p2);
        map1.put("第三个", p3);

        JsonUtil.saveToJsonFile(map1, "test.json");

        HashMap<String, Person> map2 = JsonUtil.loadFromJsonFile("test.json");
        for (Map.Entry<String, Person> entry : map2.entrySet())
        {
            System.out.println("key:"  + entry.getKey() + " value:" + entry.getValue());
        }
    }
}
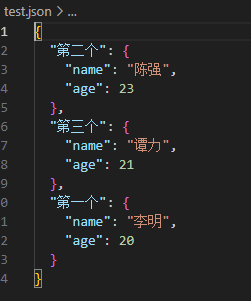
引用 jar 包
2023.9.12
这里用的上面的例子,但是不使用 Maven。将用到的 Gson 包(.jar)下载到本地,放到源文件同目录下。

import java.util.LinkedHashMap;
import java.util.Map;
import com.google.gson.Gson;
import com.google.gson.reflect.TypeToken;

public class Main
{
    public static void main(String[] args)
    {
        Gson gson = new Gson();
        Map<String, String> string_map = new LinkedHashMap<>();
        string_map.put("键", "值");
        string_map.put(null, "空");

        // 序列化
        String json = gson.toJson(string_map);
        System.out.println(json);

        // 反序列化
        TypeToken<Map<String, String>> map_type = new TypeToken<Map<String, String>>(){};
        Map<String, String> string_map2 = gson.fromJson(json, map_type);
        string_map2.forEach((k, v) -> System.out.println(k + " : " + v));

    }
}
在编译和执行的时候要指定使用到的 jar 包,Windows 下路径之间用英文分号隔开,Linux 下用英文冒号

初版完成
2023.9.14
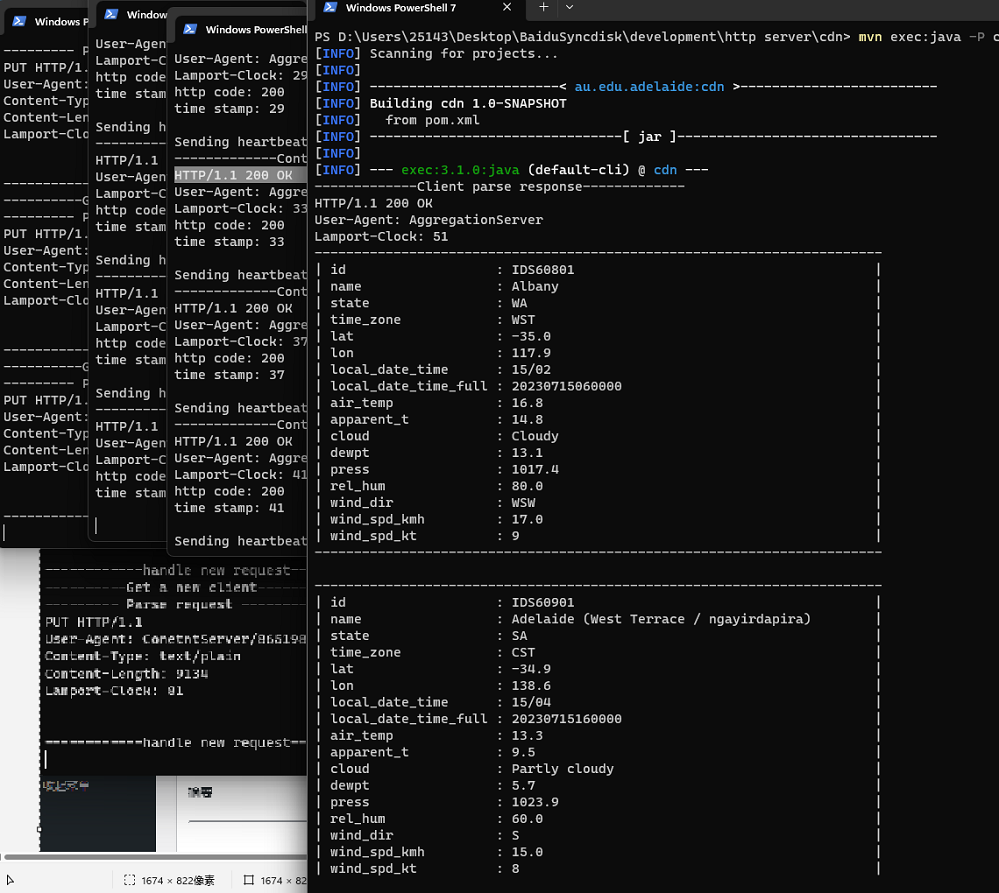
雇主那边 16 号 17:00 要交一个草案,今天中午我已经交给中介了。

主体功能已经实现,还待调试完善,另外还没写自动化测试程序。
最左边的是聚合服务器,中间两个是内容服务器,向聚合服务器 PUT 数据,最右边的是 GET 客户端,用来从聚合服务器获取数据,图中客户端打印显示的两个框就是两个内容服务器推送到聚合服务器的数据。
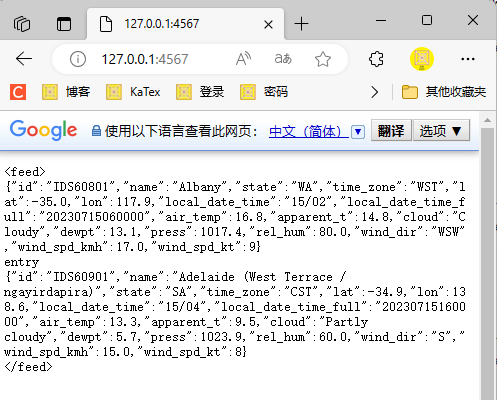
也可以使用浏览器作为客户端去访问聚合服务器
单例设计模式
2023.9.14
这种模式就是一个类只能有一个对象,就比如 Windows 的任务管理器,如果已经打开了一个任务管理器窗口,再尝试打开依然还是只有一个窗口,在同一时间只有一个实例在运行,单例设计模式就是这种思想。
饿汉单例设计模式
2023.9.14
这种设计模式的思想就是将构造方法定义为私有,那么在类外就无法 new 出该类的实例,然后在类中调用构造方法创建一个类自己的实例作为静态成员,提供一个方法将这个自身静态成员作为返回值,那么就可以通过这个方法获得这个单例,且因为类自身是静态成员,也就决定了这个类成员只能有一个自己的类实例。这种设计模式中的单例对象是类静态成员,所以它是伴随类一起产生的,也就是在获取这个对象之前就已经存在了。
class SingleInstance
{
    private static SingleInstance si = new SingleInstance();

    private SingleInstance() // 私有构造方法
    {

    }

    public static SingleInstance get_single_instance() // 获得实例自身
    {
        return si;
    }

    // 以下代码用于演示

    private String string = new String();

    public void set_string(String string)
    {
        this.string = string;
    }

    public String get_string()
    {
        return this.string;
    }
}

class Main
{
    public static void main(String[] args)
    {
        SingleInstance si1 = SingleInstance.get_single_instance();
        si1.set_string("hello 世界");

        SingleInstance si2 = SingleInstance.get_single_instance();
        System.out.println(si2.get_string());
    }
}
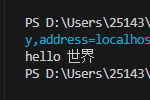
先获取的 si1 并给对象成员设置了一个字符串,再获取一个对象 si2,尝试读取类成员的字符串,发现就是给 si1 设置的字符串,那就说明 si1 和 si2 的类成员字符串是同一个,也就是说 si1 和 si2 都是同一个对象。
懒汉单例设计模式
2023.9.14
这种设计模式与上面的不同,是在获取单例对象的时候才创建这个对象。实现上还是采用私有构造方法,禁止类外创建实例,还是使用一个自身类的静态成员来保存自己,但是创建实例的工作放到获取类对象的方法中,这样就只有在获取单例对象的时候才会创建自己。
class SingleInstance
{
    private static SingleInstance si;

    private SingleInstance() // 私有构造方法
    {

    }

    public static SingleInstance get_single_instance() // 获得实例自身
    {
        if (si == null) // 不存在就创建
        {
            si = new SingleInstance();
        }
        return si;
    }

    // 以下代码用于演示

    private String string = new String();

    public void set_string(String string)
    {
        this.string = string;
    }

    public String get_string()
    {
        return this.string;
    }
}

class Main
{
    public static void main(String[] args)
    {
        SingleInstance si1 = SingleInstance.get_single_instance();
        si1.set_string("hello 世界");

        SingleInstance si2 = SingleInstance.get_single_instance();
        System.out.println(si2.get_string());
    }
}
枚举
2023.9.14
Java 枚举的使用感觉和 C 语言差不多
enum Sex
{
    BOY, GIRL
}

class Main
{
    public static void main(String[] args)
    {
        Sex person1 = Sex.BOY;
        Sex person2 = Sex.GIRL;

        System.out.println(person1);
        System.out.println(person2);
    }
}
使用 Java 自带的工具反编译枚举类,可以知道其实它也是用 class 实现的
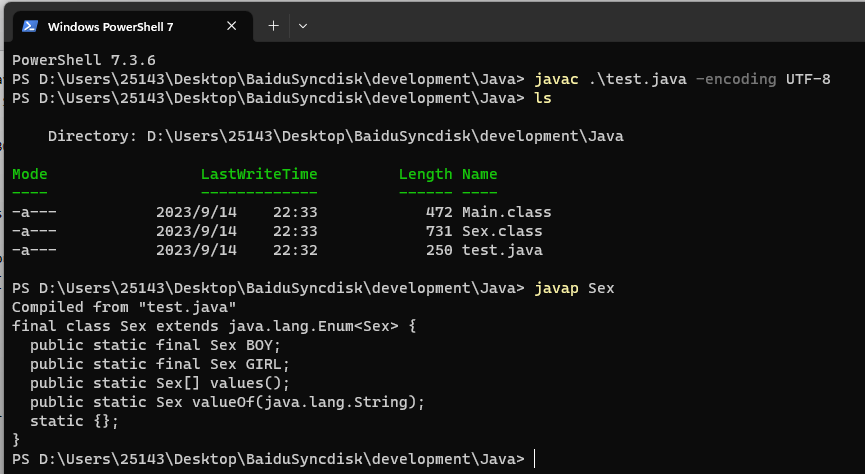
参考这部分代码的思想,可以自己用 class 实现一个“枚举”
class Sex
{
    public static final Sex BOY = new Sex("BOY");
    public static final Sex GIRL = new Sex("GIRL");

    private String name;

    private Sex(String name)
    {
        this.name = name;
    }

    @Override
    public String toString()
    {
        return name;
    }
}

class Main
{
    public static void main(String[] args)
    {
        Sex person1 = Sex.BOY;
        Sex person2 = Sex.GIRL;

        System.out.println(person1);
        System.out.println(person2);
    }
}
应用
enum Score
{
    A(5),
    B(4),
    C(3),
    D(2),
    E(1),
    F(0);

    private final int value;

    private Score(int value)
    {
        this.value = value;
    }

    public int get_value()
    {
        return this.value;
    }

    public static Score value_of(int value)
    {
        for (Score s : Score.values())
        {
            if (s.get_value() == value)
            {
                return s;
            }
        }
        return null;
    }
}

class Main
{
    public static void main(String[] args)
    {
        Score s = Score.A; // 枚举赋值
        System.out.println(s);
        s = Score.valueOf("B"); // 字符串赋值 - 内部实现的方法
        System.out.println(s);
        s = Score.value_of(0); // 数值赋值 - 自定义方法
        System.out.println(s);
    }
}
正则表达式
2023.9.15
基础的表达式规则
| 规则 | 描述 |
|---|---|
| . | 匹配任意一个字符 |
| [abc] | 匹配a、b或c中的任意一个字符 |
| [^abc] | 匹配除了a、b和c以外的任意一个字符 |
| [a-z] | 匹配a到z之间的任意一个字符 |
| [^a-z] | 匹配除了a到z之间的任意一个字符 |
| d | 匹配数字,等价于[0-9] |
| D | 匹配非数字,等价于[^0-9] |
| s | 匹配空白字符,包括空格、制表符、换行符等 |
| S | 匹配非空白字符 |
| w | 匹配单词字符,包括字母、数字、下划线等 |
| W | 匹配非单词字符 |
基本的数量词
| 数量词 | 描述 |
|---|---|
| * | 匹配零个或多个 |
| + | 匹配一个或多个 |
| ? | 匹配零个或一个 |
| {n} | 匹配恰好n个 |
| {n,} | 匹配至少n个 |
| {n,m} | 匹配至少n个,但不超过m个 |
注:转义字符使用反斜杠,比如要使用一个反斜杠本身那么就要用两个反斜杠
import java.util.regex.Matcher;
import java.util.regex.Pattern;

class Main
{
    public static void main(String[] args)
    {
        // 简单示例
        String s1 = "b";
        System.out.println(s1.matches("[abc]"));

        String s2 = "gh";
        System.out.println(s2.matches("[a-z]*"));

        // 邮箱校验             aaaaa@cccccccc.bbbbbbb(.ddddddd)
        String email_regex = "w{1,}@w{1,}(.w{2,}){1,2}";
        String email1 = "iyatt@iyatt.com";
        String email2 = "iyatt@iyatt.edu.cn";
        String email3 = "iyatt@iyatt";

        System.out.println(email1.matches(email_regex));
        System.out.println(email2.matches(email_regex));
        System.out.println(email3.matches(email_regex));

        // 匹配单层 Json
        // 这个字符串中有两段单层 Json 字段,在 Json 字段外混有其它字符串
        String text = "dsad8678sdsfdsdfsd{"id":"IDS60801","name":"Albany","state":"WA","time_zone":"WST","lat":-35.0,"lon":117.9,"local_date_time":"15/02","local_date_time_full":"20230715060000","air_temp":16.8,"apparent_t":14.8,"cloud":"Cloudy","dewpt":13.1,"press":1017.4,"rel_hum":80.0,"wind_dir":"WSW","wind_spd_kmh":17.0,"wind_spd_kt":9}afasfas8998887asffas{"name":"Li Ming", "age":20}";
        Pattern pattern = Pattern.compile("{.*?}");
        Matcher matcher = pattern.matcher(text);
        while (matcher.find())
        {
            System.out.println(matcher.group());
        }
    }
}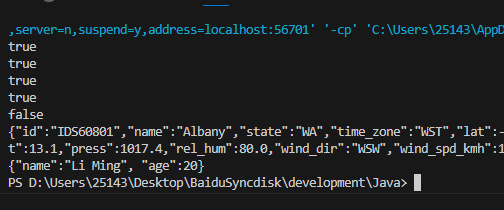
遍历 Collection 集合
迭代器
2023.9.15
这个概念和 C++ 中差不多,C++ 的 STL 中使用容器存储(集合),使用迭代器遍历容器中的元素。
import java.util.ArrayList;
import java.util.Collection;
import java.util.Iterator;

class Main
{
    public static void main(String[] args)
    {
        Collection<String> c = new ArrayList<>();
        c.add("hello");
        c.add("world");
        c.add("java");

        // 获取迭代器
        for (Iterator<String> it = c.iterator(); it.hasNext(); )
        {
            System.out.println(it.next()); // 返回迭代器中的下一个元素
        }
    }
}
for 遍历
2023.9.15
这个在 C++ 中也有这种遍历方式,只是 C++ 中有 auto 类型,可以不指定元素类型,由编译器自动推断出类型,而 Java 要指定遍历元素的类型。
刚查了一下 Java 10 中也是引入了一种自动推导类型为 var,不过我这里用的 Java 8 没法体验,等接的这个项目单完成以后再去尝试新版的特性。
import java.util.ArrayList;
import java.util.Collection;

class Main
{
    public static void main(String[] args)
    {
        Collection<String> cs = new ArrayList<>();
        cs.add("hello");
        cs.add("world");
        cs.add("java");

        // for 遍历
        for (String c : cs)
        {
            System.out.println(c);
        }
    }
}
Lambda 表达式遍历
2023.9.15
import java.util.ArrayList;
import java.util.Collection;

class Main
{
    public static void main(String[] args)
    {
        Collection<String> cs = new ArrayList<>();
        cs.add("hello");
        cs.add("world");
        cs.add("java");

        cs.forEach(s -> System.out.println(s)); // Lambda 表达式
    }
}
实际上内部实现也是用的 for,只是用 Lambda 表达式自定义操作
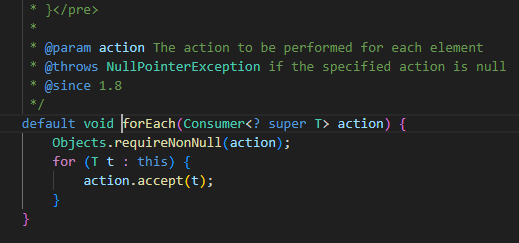
初版修订重交 – 基本完成
2023.9.15
昨天交的初版代码,给的反馈要求不使用 Maven,把依赖的 jar 包直接放在项目文件夹中一起,然后直接使用 javac 编译。另外完善项目介绍,实现了什么功能,基于什么思路完成的。
大概今天下午四点给我说的,除去做饭吃饭的时间一直弄到晚上十点搞定上面的要求,同时完成了测试代码。问了一下要求在 Linux 下测试,因此我又切换到 Ubuntu 22.04 (双系统)下安装 Java,采用的 openJDK 8。测试代码用 shell 写的,同时对客户端进行了修改,之前想的是把客户端打印输出的内容重定向保存到文件,然后自动测试脚本去匹配内容服务器上传的源文件和重定向输出保存的文件中的天气数据是否匹配,而客户端打印输出的内容还含有服务器的回复内容,以及为了美观我给获取到的天气数据加了一个表格来呈现。然后要解析这个内容的话用 shell 实现太复杂,解析起来挺烧脑的,再加上很久没写 shell 了,不太熟悉了,反正为了尝试估计都花了一两个小时,都没搞成功。
在这中间我还发现了我写的 Json 解析模块有一个小 bug,就是在天气源数据中有一个时间值含有冒号,而源数据的键和值也是用冒号间隔的,所以解析这个数据当时写的用冒号分段,然后再去空格,结果这样就导致解析出来键值所在的行中值含有的冒号及后面的字段直接丢失了。这个小小的改一下,在用冒号分割文本的时候设定只分割为两段就行,这样键和值之间的第一个冒号才作为分隔符号,后面的冒号就不再分割了。
针对测试,前面提到的我修改了客户端,就是从聚合服务器请求到的内容就直接从里面解析出 Json 字段保存为 Json 文件,这样用 shell 实现校对源文件数据和客户端获取到的数据(解析出来的 Json 文件)就十分简单了,我前面写的 Json 解析模块里已经实现了将 Json 字段保存为文件的方法,调用一下就完成了。那个 Json 模块有些方法实际都没用到,那是最开始的时候写的,基本上把可以用到的情况都写了。比如从键值文本文件读取生成对象(内容服务器读取源文件),从对象得到 Json 字符串,从字符串得到对象,从对象得到格式化的表格数据(客户端打印呈现),对象保存为 Json 文件(修改后客户端使用这个生成文件用于最后测试校对),读 Json 文件得到对象,从服务器回复内容获取 Json 字符串(客户端请求结果解析)。
最后测试脚本只要实现比对内容服务器读取的源文件和客户端保存的 Json 文件即可呈现测试结果,比较简单了。
到此为止,这个项目基本上算是完成了,该做的功能都有了,明天再调试一下看看有没有 bug。历时半个月,Java 从零开始学习,边学习边完成这个项目。
这个博文还会继续写我后续的学习记录,挺多的东西没学的,把基础打好,后面可以继续接单。因为考研的原因后面暂时就不接单了,明年再看,中间抽时间同时学习。
线程 Callable 实现 – 可获取线程执行结果
2023.9.16
import java.util.concurrent.Callable;
import java.util.concurrent.FutureTask;

class MyCallable implements Callable<String>
{
    @Override
    public String call() throws Exception // 重写 call 方法
    {
        Thread.sleep(1000); // 模拟耗时操作
        return Thread.currentThread().getName() + " " + System.currentTimeMillis();
    }
}

public class Main
{
    public static void main(String[] args)
    {
        try
        {
            MyCallable call = new MyCallable();
            FutureTask<String> task = new FutureTask<>(call);
            Thread t = new Thread(task);
            t.start();

            System.out.println(task.get()); // 获取子线程执行结果,如果子线程还没出结果会阻塞等待结果出来
        }
        catch (Exception e)
        {
            e.printStackTrace();
        }
    }
}
线程同步
2023.9.16
前面已经记录过关于线程同步的:https://blog.iyatt.com/?p=11305#synchronized_%E5%90%8C%E6%AD%A5
当时举的例子是多线程操作同一个静态成员,这个时候 synchronized 就是锁的静态成员所在的类.class。如果多线程操作的是另外的同一个类对象,那么就应该锁这个对象,使用 this。下面写了例子。
另外补充说明一个更好理解的情景:比如同一个银行卡号,有余额10000元,一个人在线下消费500,另外一个人在线上消费100。如果两个人在同一时间进行,那么就出现了线程安全的问题,两个人在操作的时候肯定都会先检查当前的余额,在同一时间进行,线下和线上在支付时检查到的余额都是10000的数据,然后分别在10000的基础上减500和100,那么最后把消费后的余额写到卡号,得到的可能是9900也可能是9500,也就是最终记录的余额是其中一个人消费后的。
线程同步则是给账号支付的步骤加锁,如果两个人同一时间消费,那么在同一时间只允许一个人进入支付操作,这个就是随机选择了,一个先进行支付,完成支付后另外一个人才能进入支付步骤,同一时间开始支付的,没有进入支付步骤的其他支付就先等待。
存在线程安全问题的代码
class ShareResources
{
    private static int counter = 0;

    public static void operate()
    {
        ++counter;
    }

    public static int get()
    {
        return counter;
    }
}

class MyThread extends Thread
{
    private ShareResources sr;

    public MyThread(ShareResources sr)
    {
        this.sr = sr;
    }

    @Override
    public void run()
    {
        for (int i = 0; i < 100000; ++i)
        {
            ShareResources.operate();
        }
    }
}

class Main
{
    public static void main(String[] args)
    {
        ShareResources sr = new ShareResources();
        MyThread mt1 = new MyThread(sr);
        MyThread mt2 = new MyThread(sr);

        mt1.start();
        mt2.start();

        try
        {
            mt1.join();
            mt2.join();
        }
        catch (Exception e)
        {
            e.printStackTrace();
        }

        System.out.println(ShareResources.get());
    }
}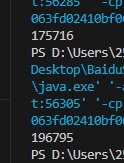
使用同步:
1.对操作静态共享资源的部分同步
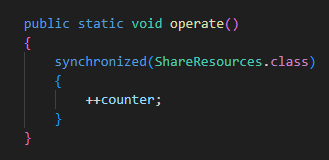
2.对整个操作共享资源的方法同步

3.如果是非静态共享资源,可以锁当前对象 – this
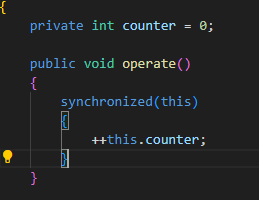
Lock 锁
2023.9.16
使用 synchronized 只知道可以做到线程同步,不能看出它的逻辑,使用 Lock 则是手动完成加解锁的步骤。
import java.util.concurrent.locks.Lock;
import java.util.concurrent.locks.ReentrantLock;

class ShareResources
{
    private int counter = 0;
    private Lock lock = new ReentrantLock(); // 创建一把锁

    public void operate()
    {
        lock.lock(); // 加锁
        try
        {
            ++this.counter;
        }
        catch (Exception e)
        {
            e.printStackTrace();
        }
        // 不管有没有异常都要解锁,避免某个线程出错,导致资源锁死,造成其它线程都不能访问
        finally
        {
            lock.unlock(); // 解锁
        }
    }

    public int get()
    {
        return this.counter;
    }
}

class MyThread extends Thread
{
    private ShareResources sr;

    public MyThread(ShareResources sr)
    {
        this.sr = sr;
    }

    @Override
    public void run()
    {
        for (int i = 0; i < 100000; ++i)
        {
            sr.operate();
        }
    }
}

class Main
{
    public static void main(String[] args)
    {
        ShareResources sr = new ShareResources();
        MyThread mt1 = new MyThread(sr);
        MyThread mt2 = new MyThread(sr);

        mt1.start();
        mt2.start();

        try
        {
            mt1.join();
            mt2.join();
        }
        catch (Exception e)
        {
            e.printStackTrace();
        }

        System.out.println(sr.get());
    }
}
函数式接口
2023.9.16
这个东西挺像 C 语言中的函数指针,用指针可以引用函数地址,然后可以通过这个指针去调用指向的函数。
Consumer
接收一个参数并执行,没有返回值
2023.9.16
import java.util.function.Consumer;

class Main
{
    static void consumer(String string, Consumer<String> con)
    {
        con.accept(string);
    }

    public static void main(String[] args)
    {
        consumer("你好,世界!",
                    s -> System.out.println(s)); // Lambda 表达式
    }
}
Supplier
2023.9.16
不接受参数,返回一个结果
import java.util.function.Supplier;

class Main
{
    static String get_string(Supplier<String> sup)
    {
        return sup.get();
    }

    public static void main(String[] args)
    {
        String string1 = "hello";
        String string2 = get_string(() ->
        {
            return string1 + " " + string1;
        });

        System.out.println(string2);
    }
}
Function
2023.9.16
接受一个参数并返回一个结果
import java.util.function.Function;

class Main
{
    static String get_string(Integer num, Function<Integer,String> fun)
    {
        return "结果是 " + fun.apply(num);
    }

    public static void main(String[] args)
    {
        String string = get_string(5,
                                    (Integer num) ->Integer.toString(num));

        System.out.println(string);
    }
}
Predicate
2023.9.16
传入一个参数返回一个布尔结果
import java.util.function.Predicate;

class Main
{
    static boolean is_empty(String string, Predicate<String> pre)
    {
        return pre.test(string);
    }

    public static void main(String[] args)
    {
        String s1 = "hello";
        String s2 = "";
        String s3 = null;

        boolean b1 = is_empty(s1, (String string) -> string == null || string.isEmpty());
        boolean b2 = is_empty(s2, (String string) -> string == null || string.isEmpty());
        boolean b3 = is_empty(s3, (String string) -> string == null || string.isEmpty());

        System.out.println(b1 + " " + b2 + " " + b3);
    }
}
BiFunction
2023.9.16
传入两个参数返回一个结果
import java.util.function.BiFunction;

class Main
{
    public static void main(String[] args)
    {
        BiFunction<String, Integer, String> bf = (name, age) -> "name: " + name + " age: " + age;
        String s = bf.apply("李明", 20);
        System.out.println(s);
    }
}
定义函数式接口
2023.9.16
// 定义一个函数式接口
@FunctionalInterface
interface IMyTest<T>
{
    void test(T msg);
}

// 定义一个函数式接口
@FunctionalInterface
interface ITest<T1, T2>
{
    T2 test(T1 msg);
}

// 用于方法引用测试
class Test
{
    static Integer test_test(String string) // 静态方法
    {
        return Integer.parseInt(string) * 2;
    }
}

class Main
{
    public static void main(String[] args)
    {
        IMyTest<String> t1 = msg -> System.out.println("消息内容为:" + msg);
        t1.test("你好,世界!");

        ITest<String, Integer> t2 = msg -> msg.length();
        int length = t2.test("hello");
        System.out.println(length);

        ITest<String, Integer> t3 = Integer::parseInt; // 方法引用
        System.out.println(t3.test("56") > t3.test("57"));

        ITest<String, Integer> t4 = Test::test_test; // 自定义方法引用
        System.out.println(t4.test("50"));
    }
}
单元测试 – Junit 5
2023.9.16
用来测试类和方法的设计是否符合预期结果
示例代码
项目结构
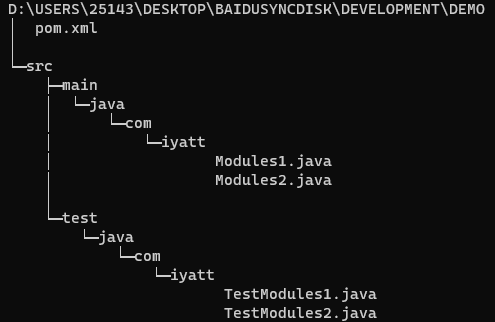
pom.xml
<?xml version="1.0" encoding="UTF-8"?>
<project xmlns="http://maven.apache.org/POM/4.0.0"
         xmlns:xsi="http://www.w3.org/2001/XMLSchema-instance"
         xsi:schemaLocation="http://maven.apache.org/POM/4.0.0 http://maven.apache.org/xsd/maven-4.0.0.xsd">
    <modelVersion>4.0.0</modelVersion>

    <groupId>com.iyatt</groupId>
    <artifactId>demo</artifactId>
    <version>1.0-SNAPSHOT</version>

    <properties>
        <maven.compiler.source>1.8</maven.compiler.source>
        <maven.compiler.target>1.8</maven.compiler.target>
        <project.build.sourceEncoding>UTF-8</project.build.sourceEncoding>
        <project.reporting.outputEncoding>UTF-8</project.reporting.outputEncoding>
    </properties>

    <dependencies>
        <dependency>
            <groupId>org.junit.jupiter</groupId>
            <artifactId>junit-jupiter</artifactId>
            <version>5.10.0</version>
            <scope>test</scope>
        </dependency>
    </dependencies>
</project>
Modules1.java
package com.iyatt;

public class Modules1
{
    public int add(int num1, int num2)
    {
        return num1 + num2;
    }

    public int sub(int num1, int num2)
    {
        return num1 - num2;
    }
}
Modules2.java
package com.iyatt;

public class Modules2
{
    public boolean login(String account, String password)
    {
        if (account.equals("admin") && password.equals("admin"))
        {
            return true;
        }
        return false;
    }
}
TestModules1.java
package com.iyatt;

import static org.junit.jupiter.api.Assertions.assertEquals;
import org.junit.jupiter.api.AfterAll;
import org.junit.jupiter.api.AfterEach;
import org.junit.jupiter.api.BeforeAll;
import org.junit.jupiter.api.BeforeEach;
import org.junit.jupiter.api.Test;

public class TestModules1
{
    private Modules1 m1 = new Modules1();

    @Test // 测试方法必须使用注解
    // 命名一般以 test 开头加测试方法名
    // 返回值为 void 或 TestExecutionResult(枚举,用于表示测试结果
    // 参数可以使用注解传递用于测试,比如 @ValueSource(ints = {1, 2, 3, 4, 5}) 可以支持只有一个参数的方法的测试,然后挨个传递进去测试
    //                                 @CsvSource({"test,TEST", "tEst,TEST", "Java,JAVA"})可以支持有多个参数的方法测试,比如这里每个字符串代表一批次的测试参数,方法的多个参数用逗号隔开
    void test_add()
    {
        assertEquals(8, this.m1.add(5, 3)); // 期待值,实际结果
    }

    @Test
    void test_sub()
    {
        assertEquals(3, this.m1.sub(5, 2));
    }

    @BeforeEach
    void before_each()
    {
        System.out.println("在每个测试方法之前执行");
    }

    @BeforeAll
    static void before_all() // 如果当前测试类没有使用 @TestInstance(Lifecycle.PER_CLASS) 注解,那么该方法必须是 static
    {
        System.out.println("在所有测试方法之前执行");
    }

    @AfterEach
    void after_each()
    {
        System.out.println("在每个测试方法之后执行");
    }

    @AfterAll
    static void after_all() // 同 @BeforeAll
    {
        System.out.println("在所有测试方法之后执行");
    }
}
TestModules2.java
package com.iyatt;

import static org.junit.jupiter.api.Assertions.assertTrue;
import org.junit.jupiter.api.Test;

public class TestModules2
{
    Modules2 m2 = new Modules2();

    @Test
    // @Disabled // 禁用测试
    void test_login()
    {
        assertTrue(m2.login("a", "admin"));
    }
}
测试命令
测试所有方法
mvn test测试指定类(多个可以使用英文逗号隔开,下同)
mvn test -Dtest=<测试类名1>,<测试类名2>测试正常就是绿色的
测试 Modules1 类
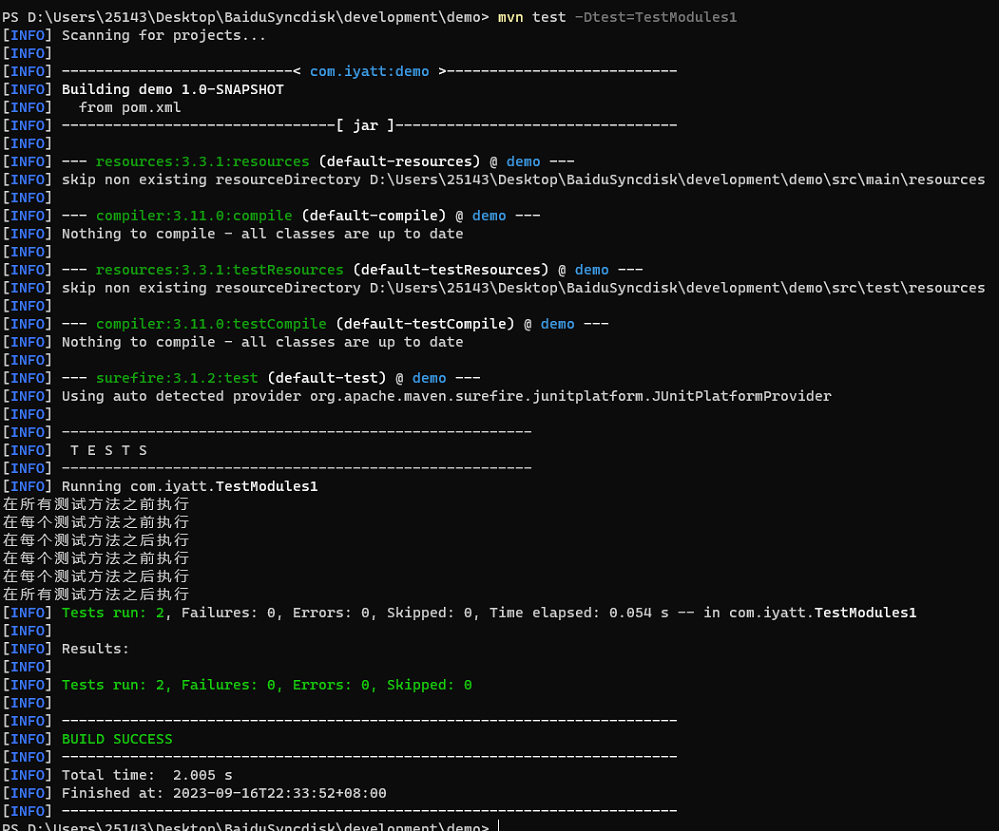
测试 Modules1 类中 add 方法
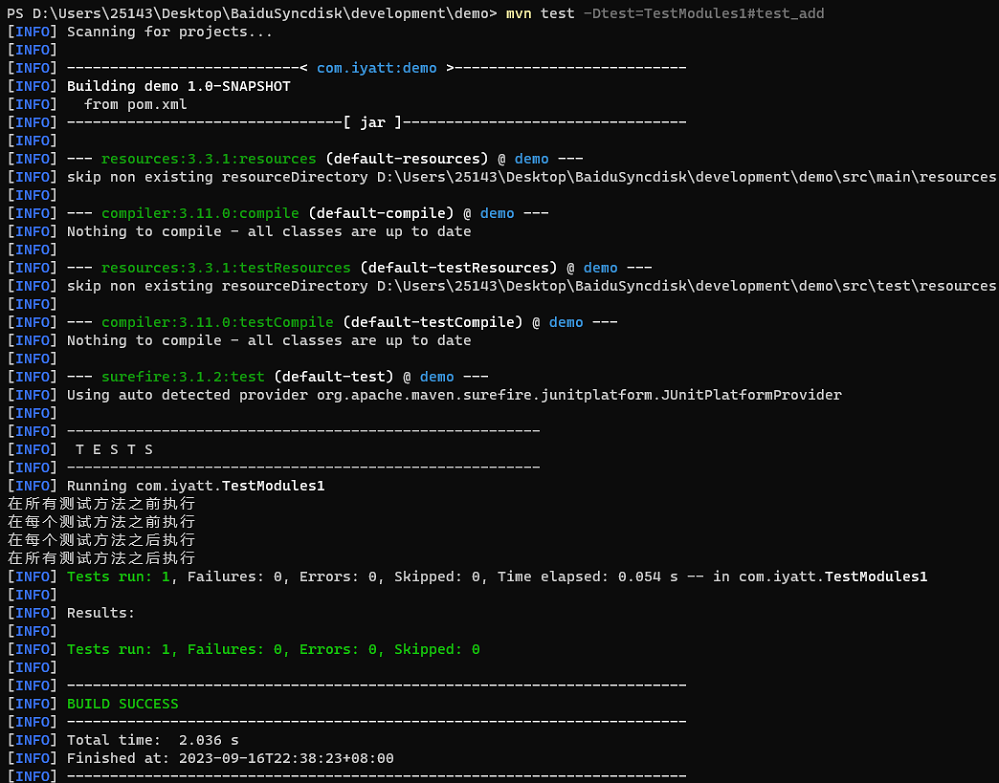
测试指定类中的指定方法
mvn test -Dtest=<测试类名>#<测试方法>这部分我在测试方法里故意写的错的,让测试结果和预期不同

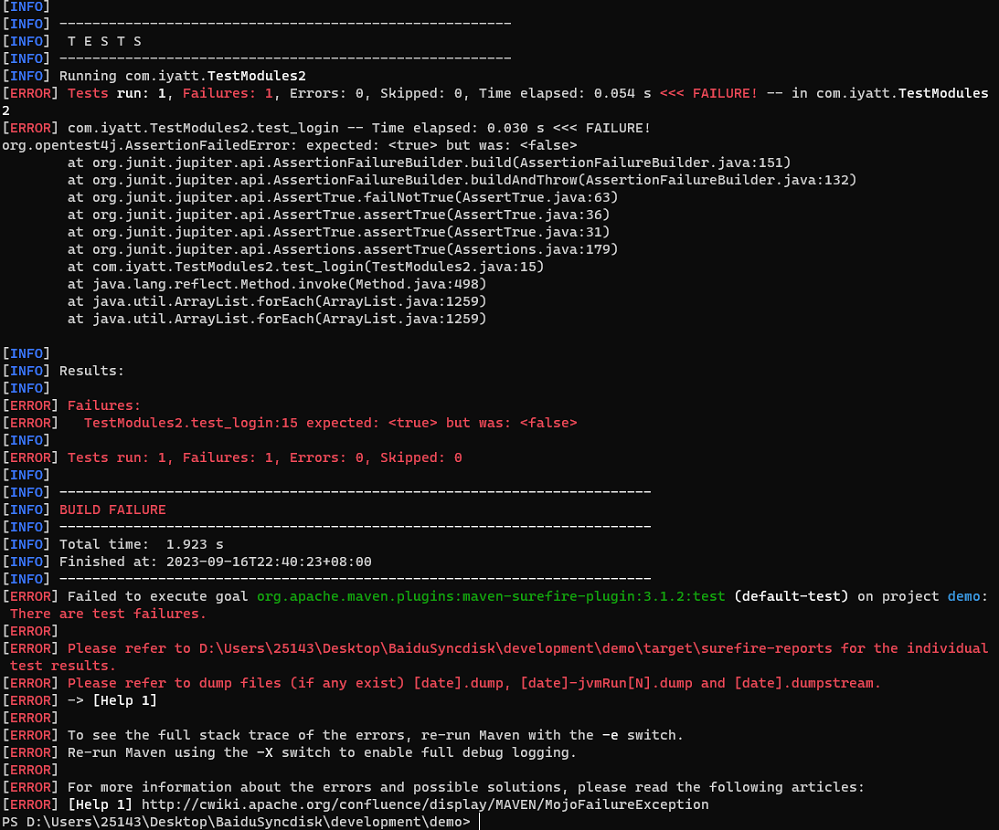
反射
2023.9.16
发射指在运行的时候对于任何类都可以获取它的全部构成,比如类对象(Class)、构造器对象(Constructor)、成员变量(Field)、成员方法(Method)
获取类对象
2023.9.17
源码结构

Test.java
package com.iyatt;

public class Test
{

}
Main.java
import com.iyatt.Test;

class Main
{
    public static void main(String[] args) throws Exception
    {
        // // 获取 Test 类对象

        // 方法一 - 类名
        Class<?> c1 = Test.class;

        // 方法二 - 实例对象
        Test t1 = new Test();
        Class<?> c2 = t1.getClass();

        // 方法三 - 全限定名
        Class<?> c3 = Class.forName("com.iyatt.Test");

        // // 获取简名(类名)
        System.out.println("简名:" + c1.getSimpleName());

        // // 获取全限定名(含包路径)
        System.out.println("全限定名:" + c2.getName());
    }
}
获取构造器对象
2023.9.17
import java.lang.reflect.Constructor;

class Person
{
    private String name;
    private int age;

    private Person()
    {
        this.name = null;
        this.age = -1;
    }

    public Person(String name, int age)
    {
        this.name = name;
        this.age = age;
    }

    public void show()
    {
        if (name != null)
        {
            System.out.print(this.name);
        }
        else
        {
            System.out.print("null");
        }
        System.out.print(" ");
        System.out.println(this.age);
    }
}

class Main
{
    static void show_constructors(Constructor<?>[] cs)
    {
        System.out.println("-----------------------------------------");
        for (Constructor<?> c : cs)
        {
            System.out.println("方法名:" + c.getName() + " 参数个数:" + c.getParameterCount()); // 获取构造器名字
        }
    }

    static void show_constructor(Constructor<?> c)
    {
        System.out.println("-----------------------------------------");
        System.out.println("方法名:" + c.getName() + " 参数个数:" + c.getParameterCount()); // 获取构造器名字
    }

    public static void main(String[] args) throws Exception
    {
        Class<?> p = Person.class;

        // 获取所有 public 构造器 - 含父类
        Constructor<?>[] cs1 = p.getConstructors();
        show_constructors(cs1);

        // 获取全部构造器
        Constructor<?>[] cs2 = p.getDeclaredConstructors();
        show_constructors(cs2);

        // 获取指定的 public 构造器 - 含父类
        Constructor<?> c1 = p.getConstructor(String.class, int.class); // 通过构造方法的参数去匹配
        show_constructor(c1);

        // 获取指定的构造器
        Constructor<?> c2 = p.getDeclaredConstructor(String.class, int.class); // public
        show_constructor(c2);

        Constructor<?> c3 = p.getDeclaredConstructor(); // private
        show_constructor(c3);

        // 用构造器实例对象
        c3.setAccessible(true); // 打开 private 构造器访问权限
        Person p1 = (Person)c3.newInstance(); // 无参
        p1.show();

        Person p2 = (Person)c2.newInstance("李明", 20); // 有参
        p2.show();
    }
}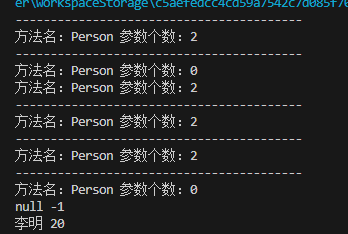
获取成员变量
2023.9.17
import java.lang.reflect.Field;

class Person
{
    private String name = "李明";
    private int age = 20;
    public static int value1 = 1;
    public final static String value2;
    static
    {
        value2 = "hello";
    }
}

class Main
{
    static void show_fields(Field[] fields)
    {
        System.out.println("-------------------------------------------------");
        for (Field field : fields)
        {
            System.out.println("成员名:" + field.getName() + " 成员类型:" + field.getType());
        }
    }

    static void show_field(Field field)
    {
        System.out.println("-------------------------------------------------");
        System.out.println("成员名:" + field.getName() + " 成员类型:" + field.getType());
    }
    public static void main(String[] args) throws Exception
    {
        Class<?> p = Person.class;

        // 获取成员变量
        Field[] fields1 = p.getFields(); // public - 含父类
        show_fields(fields1);

        Field field1 = p.getField("value2"); // public,指定 - 含父类
        show_field(field1);

        Field[] fields2 = p.getDeclaredFields(); // 所有
        show_fields(fields2);

        Field field2 = p.getDeclaredField("name"); // 指定
        show_field(field2);

        // 实例对象
        Person person = new Person();

        // 赋值
        field2.setAccessible(true); // 开启 private 成员(name)访问权限 - 不建议
        System.out.println(field2.get(person));
        field2.set(person, "小红");
        System.out.println(field2.get(person));
    }
}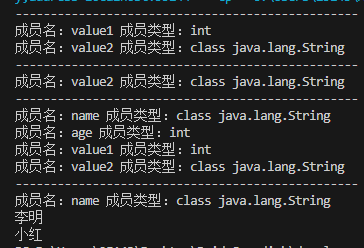
获取成员方法
2023.9.17
import java.lang.reflect.Method;

class Test
{
    private int test1(String s1, String s2)
    {
        return Integer.parseInt(s1) + Integer.parseInt(s2);
    }

    public void test2()
    {

    }

    public static void test3(String string1, String string2)
    {
        System.out.println(string1 + string2);
    }
}

class Main
{
    static void show_method(Method m)
    {
        System.out.println("--------------------------------------------------");
        System.out.println("方法名:" + m.getName() + " 参数个数:" + m.getParameterCount() + " 返回值类型:" + m.getReturnType());
        System.out.println("--------------------------------------------------");
    }

    static void show_methods(Method[] ms)
    {
        System.out.println("--------------------------------------------------");
        for (Method m : ms)
        {
            System.out.println("方法名:" + m.getName() + " 参数个数:" + m.getParameterCount() + " 返回值类型:" + m.getReturnType());
        }
        System.out.println("--------------------------------------------------");
    }

    public static void main(String[] args) throws Exception
    {
        Class<?> t = Test.class;

        // 获取成员方法
        Method m1 = t.getMethod("test2"); // public,指定 - 含父类
        show_method(m1);

        Method[] ms1 = t.getMethods(); // public,所有 - 含父类的
        show_methods(ms1);

        Method  m2 = t.getDeclaredMethod("test1", String.class, String.class); // 指定
        show_method(m2);
        Method m3 = t.getDeclaredMethod("test3", String.class, String.class);

        Method[] ms2 = t.getDeclaredMethods(); // 所有
        show_methods(ms2);

        // 调用方法
        Test test = new Test();
        m2.setAccessible(true); // 打开 private 访问权限
        Object result = m2.invoke(test, "7", "3"); // 执行并获取返回值
        System.out.println(result);

        m3.invoke(Test.class, "hello", " world"); // 静态方法调用
    }
}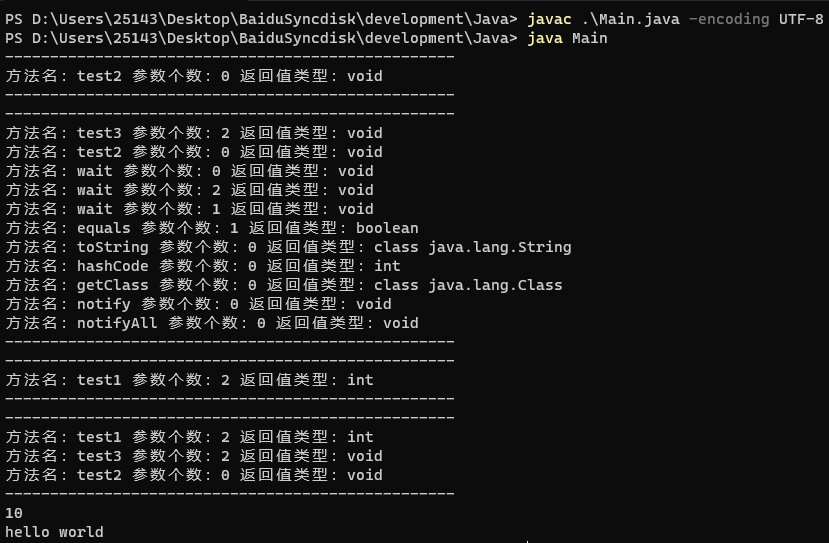
反射使用示例
2023.9.17
这里写了一个例子,首先集合的类型定为整形了,但是因为 Java 类型擦除的原因,最终在编译之后 Integer 被擦除,往上变为了 Object,这里使用反射机制可以往里面添加字符串类型的数据也行。
import java.lang.reflect.Method;
import java.util.ArrayList;
import java.util.Collection;

public class Main
{
    public static void main(String[] args) throws Exception
    {
        Collection<Integer> c = new ArrayList<>();
        c.add(1);
        c.add(2);
        c.add(3);

        Class<?> class_object = c.getClass();
        Method add_method =  class_object.getDeclaredMethod("add", Object.class);
        add_method.invoke(c, "你好");
        System.out.println(c);
    }
}
注解
2023.9.17
注释人给人看的,方便理解代码,注解是给编译器和 JVM 看的,根据注解完成相应功能。比如前面常用的 @Override 用来标记方法重写,可以帮助编译器检查是否正确重写父类方法,
自定义注解语法
2023.9.17
@interface Book1 // 自定义注解
{

}

@interface Book2 // 自定义注解 - 自定义属性
{
    String name();
    String[] authors();
    double price();
    String publish_place() default "中国"; // 默认值
}

@interface Book3 // 自定义注解 - 特殊属性
{
    String value(); // 属性名为 value
}

@interface Book4 // 自定义注解 - 特殊属性
{
    String value();
    int num() default 10; // 含有默认值的属性
}

class Test
{
    @Book1 // 使用注解
    void test1()
    {

    }

    @Book2(name="《Java 从入门到放弃》", authors={"IYATT-yx", "yx"}, price=99.9) // 数组用大括号括起来,逗号分隔,有默认值的可以不写
    void test2()
    {

    }

    @Book3("值") // 只有 value 属性的时候可以不写 value=
    @Book4("值") // 除了 value 属性其它属性有默认值也可以省略
    void test3()
    {

    }

    @Book4(value="值", num=1) // 如果除了 value 属性其它属性也要设值的还是要写 value=
    void test4()
    {

    }
}
元注解
2023.9.17
用在自定义注解上的注解
- @Target 用来约束自定义注解可以在哪些地方使用的(默认任意位置)
- @Retention 申明自定义注解的生命周期
import java.lang.annotation.ElementType;
import java.lang.annotation.Retention;
import java.lang.annotation.RetentionPolicy;
import java.lang.annotation.Target;

@Target(ElementType.METHOD) // 只能在方法上注解
@interface MyTest1
{

}

@Target({ElementType.METHOD, ElementType.FIELD}) // 既能在方法注解,也能在成员变量注解
@interface MyTest2
{

}

@Retention(RetentionPolicy.CLASS) // 默认情况,在源码和字节码阶段起作用
@interface MyTest3
{

}

@Retention(RetentionPolicy.SOURCE) // 只在源码阶段起作用
@interface MyTest4
{

}

@Retention(RetentionPolicy.RUNTIME) // 在源码,字节码,运行期间都能起作用
@interface MyTest5
{

}
解析注解
2023.9.18
import java.lang.annotation.ElementType;
import java.lang.annotation.Retention;
import java.lang.annotation.RetentionPolicy;
import java.lang.annotation.Target;
import java.lang.reflect.Method;

// 定义一个注解
@Retention(RetentionPolicy.RUNTIME) // 运行时存在
@Target(ElementType.METHOD) // 在方法上使用
@interface Description
{
    String value();
}

// 定义一个类使用注解
class Person
{
    @Description("我会说话")
    void speak(String s)
    {
        System.out.println(s);
    }

    @Description("我在跑步")
    void run(String s)
    {
        System.out.println(s);
    }
}

// 定义一个解析器
class AnnotationParser
{
    static void parser(Object obj) throws Exception
    {
        Class<?> c = obj.getClass(); // 获取传入对象的类对象
        Method[] methods = c.getDeclaredMethods(); // 获取类对象的所有方法
        for (Method method : methods) // 遍历
        {
            if (method.isAnnotationPresent(Description.class)) // 判断方法是否有上面自定义的注解
            {
                Description annotation = method.getAnnotation(Description.class); // 获取注解实例
                String value = annotation.value(); // 获取注解属性
                method.invoke(obj, value); // 将注解属性值作为参数传递给使用注解的方法
            }
        }
    }
}

class Main
{
    public static void main(String[] args) throws Exception
    {
        Person p = new Person();
        AnnotationParser.parser(p);
    }
}
模拟 junit 的 @Test 注解
2023.9.18
import java.lang.annotation.ElementType;
import java.lang.annotation.Retention;
import java.lang.annotation.RetentionPolicy;
import java.lang.annotation.Target;
import java.lang.reflect.Method;

@Retention(RetentionPolicy.RUNTIME)
@Target(ElementType.METHOD)
@interface MyTest // 模拟 junit 的 Test 方法,使用该注解的方法才可以执行
{

}

class Demo // 使用注解
{
    @MyTest
    void demo1()
    {
        System.out.println("demo1");
    }

    void demo2()
    {
        System.out.println("demo2");
    }

    void demo3()
    {
        System.out.println("demo3");
    }

    @MyTest
    void demo4()
    {
        System.out.println("demo4");
    }
}

class AnnotationParser
{
    static void parser(Object obj) throws Exception
    {
        Class<?> c = obj.getClass(); // 获取类对象
        Method[] methods = c.getDeclaredMethods(); // 获取类中的方法
        for (Method method : methods) // 遍历
        {
            if (method.isAnnotationPresent(MyTest.class)) // 如果使用了 MyTest 注解
            {
                method.invoke(obj);
            }
        }
    }

    public static void main(String[] args) throws Exception
    {
        parser(new Demo());
    }
}
只有使用了 @MyTest 注解的方法才会执行

XML 处理 – DOM4J
2023.9.18
这里也使用 Maven 配置,下面是我的配置
<?xml version="1.0" encoding="UTF-8"?>
<project xmlns="http://maven.apache.org/POM/4.0.0"
         xmlns:xsi="http://www.w3.org/2001/XMLSchema-instance"
         xsi:schemaLocation="http://maven.apache.org/POM/4.0.0 http://maven.apache.org/xsd/maven-4.0.0.xsd">
    <modelVersion>4.0.0</modelVersion>

    <groupId>com.iyatt</groupId>
    <artifactId>demo</artifactId>
    <version>1.0-SNAPSHOT</version>

    <properties>
        <maven.compiler.source>1.8</maven.compiler.source>
        <maven.compiler.target>1.8</maven.compiler.target>
        <project.build.sourceEncoding>UTF-8</project.build.sourceEncoding>
        <project.reporting.outputEncoding>UTF-8</project.reporting.outputEncoding>
    </properties>

    <dependencies>
        <dependency>
            <groupId>org.dom4j</groupId>
            <artifactId>dom4j</artifactId>
            <version>2.1.4</version>
        </dependency>
        <dependency>
            <groupId>jaxen</groupId>
            <artifactId>jaxen</artifactId>
            <version>2.0.0</version>
        </dependency>
    </dependencies>
</project>
注:涉及到 XPath 的功能依赖 jaxen 库
DOM4J 接口关系
java.lang.Cloneable
└── org.dom4j.Node
    ├── org.dom4j.Attribute
    ├── org.dom4j.Branch
    │   ├── org.dom4j.Document
    │   └── org.dom4j.Element
    ├── org.dom4j.CharacterData
    │   ├── org.dom4j.CDATA
    │   ├── org.dom4j.Comment
    │   └── org.dom4j.Text
    ├── org.dom4j.DocumentType
    ├── org.dom4j.Entity
    └── org.dom4j.ProcessingInstruction
org.dom4j.ElementHandler
org.dom4j.ElementPath
org.dom4j.NodeFilter
org.dom4j.Visitor
org.dom4j.XPath| 接口 | 功能 |
|---|---|
| Attribute | 定义了XML的属性,可以获取和设置属性的名称和值 |
| Branch | 定义了能够包含子节点的节点,如XML元素和文档,可以添加、删除和遍历子节点 |
| CDATA | 定义了XML CDATA区域,可以获取和设置CDATA的文本内容 |
| CharacterData | 是一个标识接口,标识基于字符的节点,如CDATA,Comment, Text |
| Comment | 定义了XML注释的行为,可以获取和设置注释的文本内容 |
| Document | 定义了XML文档,可以获取和设置文档的根节点、声明、类型等信息 |
| DocumentType | 定义了XML DOCTYPE声明,可以获取和设置文档类型名称、公共标识符、系统标识符等信息 |
| Element | 定义了XML元素,可以添加、删除和遍历元素的子节点、属性、命名空间等信息 |
| ElementHandler | 定义了元素对象的处理器,可以在解析XML文档时对特定的元素进行处理 |
| ElementPath | 被ElementHandler使用,用于获取当前正在处理的路径层次信息 |
| Entity | 定义了XML实体,可以获取和设置实体的名称和文本内容 |
| Node | 为DOM4J中所有的XML节点定义了多态行为,可以获取和设置节点的名称、类型、父节点、文档等信息 |
| NodeFilter | 定义了在DOM4J节点中产生的一个过滤器或谓词的行为,可以根据一定的条件选择或排除某些节点 |
| ProcessingInstruction | 定义了XML处理指令,可以获取和设置指令的目标和数据 |
| Visitor | 用于实现访问者模式,可以对DOM4J树中的各种节点进行访问和操作 |
| XPath | 在分析一个字符串后会提供一个XPath表达式,可以根据XPath语法选择或修改DOM4J树中的节点 |
对象存储
2023.9.18
这里写了示例,将对象存储为 XML 文件以及读取 XML 文件创建对象
存储为属性
package com.iyatt;

import java.io.File;
import java.io.FileOutputStream;
import java.io.OutputStreamWriter;
import java.io.Writer;
import java.util.ArrayList;
import java.util.List;
import org.dom4j.Document;
import org.dom4j.DocumentException;
import org.dom4j.DocumentHelper;
import org.dom4j.Element;
import org.dom4j.io.OutputFormat;
import org.dom4j.io.SAXReader;
import org.dom4j.io.XMLWriter;

// 用于演示存储与读取的对象
class Person
{
    private String name;
    private int age;

    public Person(String name, int age)
    {
        this.name = name;
        this.age = age;
    }

    public String get_name()
    {
        return this.name;
    }

    public int get_age()
    {
        return this.age;
    }

    @Override
    public String toString()
    {
        return "Person [name=" + this.name + ", age=" + age + "]";
    }
}

// 对象存储和读取的实现
class XMLUtil
{
    public static void save_to_xml(String xml_path, List<Person> persons) throws Exception
    {
        Document document = DocumentHelper.createDocument(); // 创建一个空的文档对象
        Element root = document.addElement("persons"); // 添加根元素
        for (Person person : persons) // 遍历对象,为对象创建子元素并设置属性
        {
            Element person_element = root.addElement("person");
            person_element.addAttribute("name", person.get_name());
            person_element.addAttribute("age", String.valueOf(person.get_age()));
        }

        try (Writer w = new OutputStreamWriter(new FileOutputStream(xml_path), "UTF-8"))
        {
            // 设置输出格式
            OutputFormat format = OutputFormat.createPrettyPrint();
            format.setNewlines(true); // 换行
            format.setIndentSize(4); // 设置缩进大小
            format.setEncoding("UTF-8"); // 设置编码

            XMLWriter writer = new XMLWriter(w, format); // 输出 XML 文件
            writer.write(document); // 将文档写入文件
        }
    }

    public static List<Person> read_from_xml(String xml_path) throws DocumentException
    {
        List<Person> persons = new ArrayList<>();
        SAXReader reader = new SAXReader(); // 用于解析 XML 文件
        reader.setEncoding("UTF-8"); // 指定编码
        Document document = reader.read(new File(xml_path)); // 读取 XML 文件得到文档对象
        Element root = document.getRootElement(); // 获取根元素
        List<Element> person_elements = root.elements(); // 获取所有子元素
        for (Element person_element : person_elements) // 遍历子元素创建对应对象
        {
            Person person = new Person(person_element.attributeValue("name"),
                                    Integer.parseInt(person_element.attributeValue("age")));
            persons.add(person);
        }
        return persons;
    }
}

// 使用示例
class Main
{
    public static void main(String[] args) throws Exception
    {
        Person p1 = new Person("李明", 20);
        Person p2 = new Person("陈强", 23);
        Person p3 = new Person("谭力", 19);
        List<Person> ps = new ArrayList<>();
        ps.add(p1);
        ps.add(p2);
        ps.add(p3);

        XMLUtil.save_to_xml("obj.xml", ps); // 将对象保存为 XML 文件

        List<Person> ps1 = XMLUtil.read_from_xml("obj.xml"); // 从 XML 文件读取创建对象
        for (Person p : ps1)
        {
            System.out.println(p);
        }
    }
}
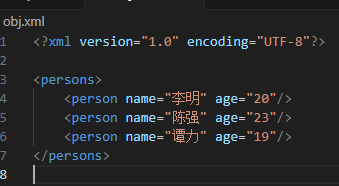
存储为值
package com.iyatt;

import java.io.File;
import java.io.FileOutputStream;
import java.io.OutputStreamWriter;
import java.io.Writer;
import java.util.ArrayList;
import java.util.List;
import org.dom4j.Document;
import org.dom4j.DocumentException;
import org.dom4j.DocumentHelper;
import org.dom4j.Element;
import org.dom4j.io.OutputFormat;
import org.dom4j.io.SAXReader;
import org.dom4j.io.XMLWriter;

// 用于演示存储与读取的对象
class Person
{
    private String name;
    private int age;

    public Person(String name, int age)
    {
        this.name = name;
        this.age = age;
    }

    public String get_name()
    {
        return this.name;
    }

    public int get_age()
    {
        return this.age;
    }

    @Override
    public String toString()
    {
        return "Person [name=" + this.name + ", age=" + age + "]";
    }
}

// 对象存储和读取的实现
class XMLUtil
{
    public static void save_to_xml(String xml_path, List<Person> persons) throws Exception
    {
        Document document = DocumentHelper.createDocument(); // 创建一个空的文档对象
        Element root = document.addElement("persons"); // 添加根元素
        for (Person person : persons) // 遍历对象,为对象创建子元素并设置属性
        {
            Element person_element = root.addElement("person");
            person_element.addElement("name").setText(person.get_name());
            person_element.addElement("age").setText(String.valueOf(person.get_age()));
        }

        try (Writer w = new OutputStreamWriter(new FileOutputStream(xml_path), "UTF-8"))
        {
            // 设置输出格式
            OutputFormat format = OutputFormat.createPrettyPrint();
            format.setNewlines(true); // 换行
            format.setIndentSize(4); // 设置缩进大小
            format.setEncoding("UTF-8"); // 设置编码

            XMLWriter writer = new XMLWriter(w, format); // 输出 XML 文件
            writer.write(document); // 将文档写入文件
        }
    }

    public static List<Person> read_from_xml(String xml_path) throws DocumentException
    {
        List<Person> persons = new ArrayList<>();
        SAXReader reader = new SAXReader(); // 用于解析 XML 文件
        reader.setEncoding("UTF-8"); // 指定编码
        Document document = reader.read(new File(xml_path)); // 读取 XML 文件得到文档对象
        Element root = document.getRootElement(); // 获取根元素
        List<Element> person_elements = root.elements(); // 获取所有子元素
        for (Element person_element : person_elements) // 遍历子元素创建对应对象
        {
            Person person = new Person(person_element.elementText("name"),
                                    Integer.parseInt(person_element.elementText("age")));
            persons.add(person);
        }
        return persons;
    }
}

// 使用示例
class Main
{
    public static void main(String[] args) throws Exception
    {
        Person p1 = new Person("李明", 20);
        Person p2 = new Person("陈强", 23);
        Person p3 = new Person("谭力", 19);
        List<Person> ps = new ArrayList<>();
        ps.add(p1);
        ps.add(p2);
        ps.add(p3);

        XMLUtil.save_to_xml("obj.xml", ps); // 将对象保存为 XML 文件

        List<Person> ps1 = XMLUtil.read_from_xml("obj.xml"); // 从 XML 文件读取创建对象
        for (Person p : ps1)
        {
            System.out.println(p);
        }
    }
}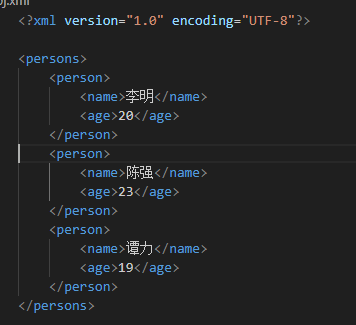
try-catch-resource 使用
2023.9.18
前面在面对资源释放的问题上一直都是使用的 try-catch-finally,这个语句不管成功与否都会执行 finall 中的语句,然后在释放资源 close 的地方又要套娃捕捉异常,写起来就挺复杂的。在 Java 7 的时候就引入了 try-catch-resource,在实现了 AutoCloseable 接口或者 Closeable 接口的资源类中可以使用,在 try 后加入 (),括号中间放打开资源的语句,后续就不用手动处理资源释放。
import java.io.File;
import java.io.FileWriter;

class test
{
    public static void main(String[] args) throws Exception
    {
        // 写完文件会自动关闭
        try (FileWriter fw = new FileWriter(new File("test.txt")))
        {
            fw.write("hello world");
        }
    }
}
